AD Agent on Cloud-IAM

The AD Agent (Cloud-IAM Directory Connector) lets your Cloud-IAM Keycloak deployment authenticate users against your on-premise Active Directory or LDAP server, without ever opening an inbound port on your firewall.
The agent runs on your network and connects outbound to your Keycloak deployment hosted on Cloud-IAM. Every authentication and user lookup performed by Keycloak is forwarded over that tunnel to your directory, and the result travels back over the same connection.
Why use it?
Most Keycloak LDAP integrations require either putting your AD on the public internet or running a site-to-site VPN. The AD Agent removes both: a single outbound TLS connection from your network is enough. Passwords in transit are encrypted end-to-end with an AES-256 key shared between your agent and your Keycloak deployment (the Cloud-IAM platform hosts your Keycloak but does not decrypt the credentials in transit).
How it works
   ┌─── Your network (on-premise) ───────────────────┐     ┌─── Cloud-IAM ──────┐
   │                                                 │     │                    │
   │   ┌───────────────┐                             │     │                    │
   │   │  AD / LDAP    │ ◄──── LDAPS (636) ──┐       │     │                    │
   │   └───────────────┘                     │       │     │                    │
   │                                         │       │     │                    │
   │                                  ┌──────┴──────┐│     │┌────────────────┐  │
   │                                  │   Agent     ├┼─────┼┤    Keycloak    │  │
   │                                  │  (Docker)   ││ wss ││  (Cloud-IAM)   │  │
   │                                  └─────────────┘│     │└────────────────┘  │
   │                                                 │     │                    │
└─────────────────────────────────────────────────┘ └────────────────────┘- The agent opens one outbound WebSocket per Keycloak node in your deployment (so each node can reach its local broker even during rolling updates).
- No inbound port is required on your side.
- Passwords are encrypted inside your Keycloak deployment and decrypted only by your agent right before the LDAP bind.
- The agent is stateless: restart it, redeploy it, scale it down to zero and back, and it will reconnect on its own.
Prerequisites
Before enabling the AD Agent:
- Dedicated Keycloak deployment on Cloud-IAM. The AD Agent is not available on shared / starter deployments.
- Cloud-IAM activates the feature for you. AD Agent is a privileged feature: enabling it triggers a redeploy of your Keycloak cluster to install the connector SPI and start the broker sidecars. Contact us at support[at]cloud-iam.com (or via the tickets center) to request activation for your deployment.
On your side, before installing the agent you will need:
- A host on your network that can reach both Cloud-IAM (outbound TCP 443) and your AD/LDAP server (TCP 636 for LDAPS, or 389 for plain LDAP).
- Docker 24+ on that host. The agent is distributed as a Docker image and is the only supported deployment mode.
- A read-only LDAP service account (bind DN + password) with permission to read user objects in the OU you want to expose.
- The base DN and the user filter (for AD:
(&(objectClass=user)(sAMAccountName={0})), for OpenLDAP:(&(objectClass=inetOrgPerson)(uid={0}))). - If you use LDAPS with a private CA, the CA certificate (or accept the temporary
LDAP_TRUST_ALL_CERTIFICATES=truefor an initial test only).
Step 1: Enable the feature with Cloud-IAM
- Contact support to request the activation of the AD Agent on your deployment.
- Once Cloud-IAM has enabled the feature, open the Cloud-IAM console, pick your deployment and go to Customisation > AD Agent.
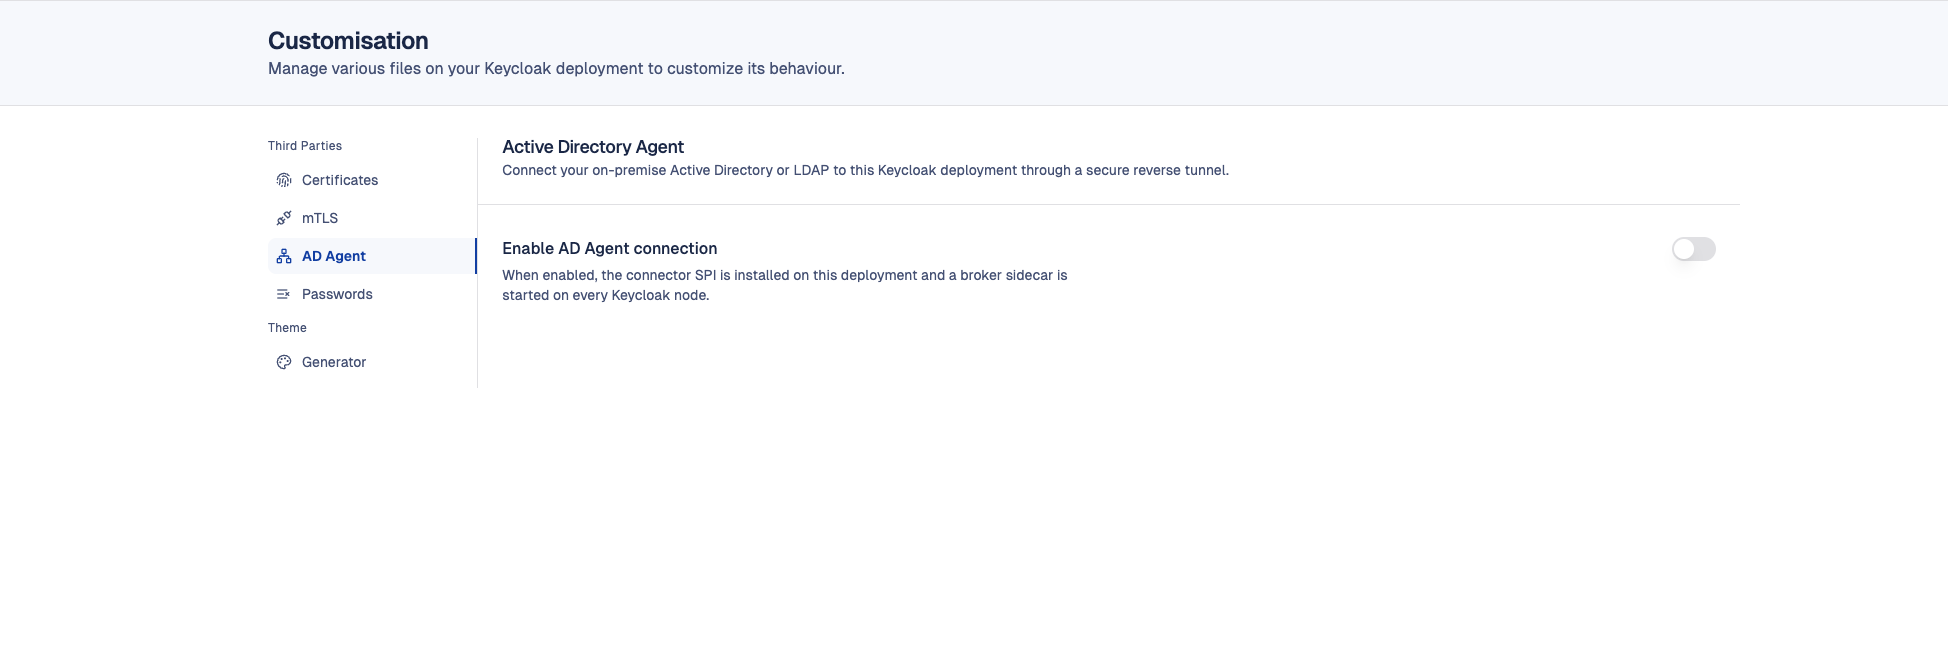
- Cloud-IAM provides you with everything you need on that page:
| Item | Example | Notes |
|---|---|---|
| Agent ID | agent-acme-01 | Unique identifier for your agent. Always visible in the console. |
| Shared key (encryption) | K7m+xQ8z9LpVwX2nB4cR6tY1uI3oP5sA8dF7gH0jK9w= | Base64 AES-256 key, 44 characters ending with =. Displayed only once, at activation time. Copy it immediately and store it in a secrets manager. If you lose it, you cannot retrieve it: see Rotate the encryption key. |
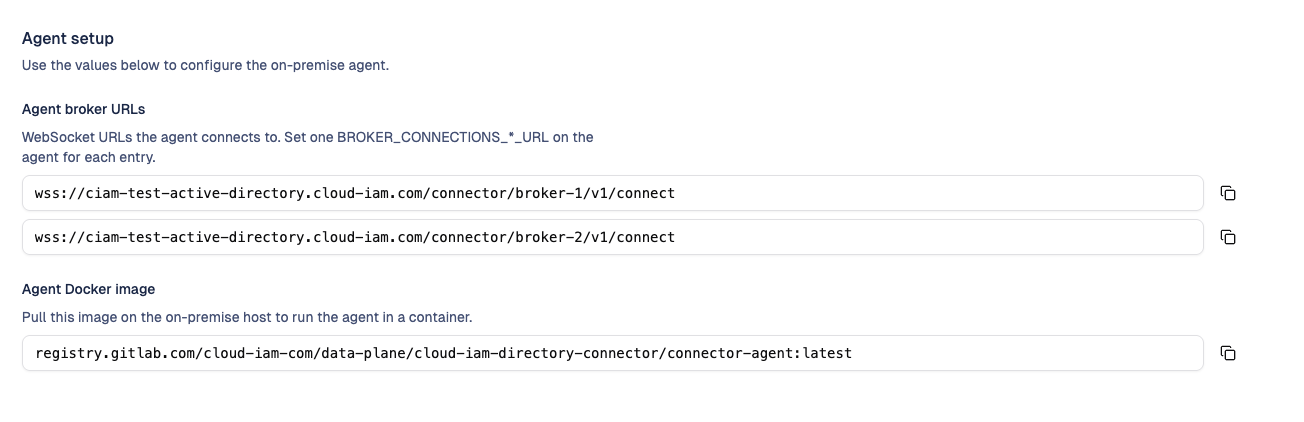
| Agent broker URLs | wss://acme.cloud-iam.com/connector/broker-1/v1/connect, wss://acme.cloud-iam.com/connector/broker-2/v1/connect, ... | One URL per Keycloak node in your deployment. The agent connects to all of them in parallel. The exact list (and therefore the number of Keycloak nodes you need to configure) is shown on this same page. |
| Agent Docker image | registry.cloud-iam.com/connector-agent:1.x.x | Image to pull on your agent host. |
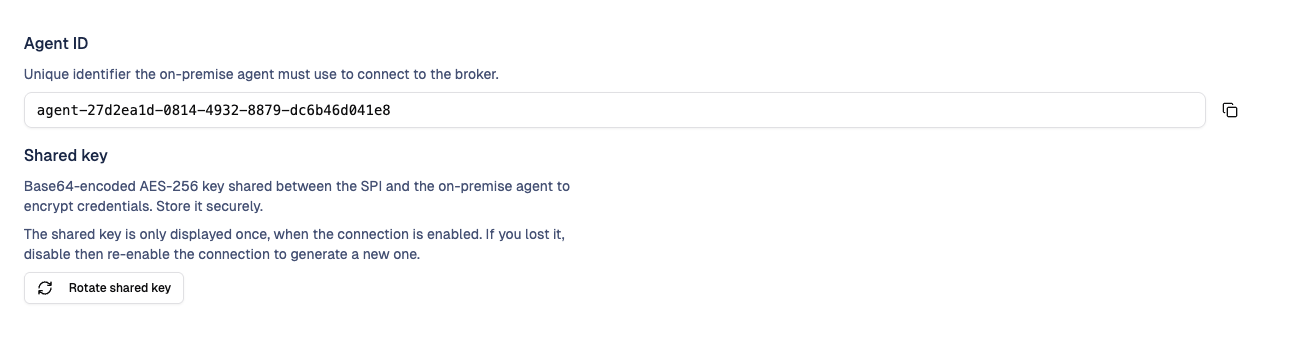
Copy the shared key now
The shared key is shown in clear only once, when the feature is activated. The console keeps the value masked afterwards (only the Copy action is available, the value itself is never re-displayed). If you do not have the key anymore, use Rotate shared key to issue a new one.
Where to find the number of broker URLs to configure
The Agent broker URLs block on the Customisation > AD Agent page lists one entry per Keycloak node currently running in your deployment. Use that list as the source of truth when you fill the BROKER_CONNECTIONS_*_URL variables below.
Step 2: Run the agent on your network
The agent is shipped as a Docker image. Run it on a host inside your network that meets the prerequisites.
Create docker-compose.yml on your agent host:
services:
  connector-agent:
    image: registry.cloud-iam.com/connector-agent:1.x.x
    restart: unless-stopped
    environment:
      AGENT_ID: "agent-acme-01"

      # One URL per broker provided in the Cloud-IAM console (0-based index).
      # Add as many entries as there are Keycloak nodes listed in the console.
      BROKER_CONNECTIONS_0_URL: "wss://acme.cloud-iam.com/connector/broker-1/v1/connect"
      BROKER_CONNECTIONS_1_URL: "wss://acme.cloud-iam.com/connector/broker-2/v1/connect"

      # Exactly the value from the Cloud-IAM console
      AGENT_ENCRYPTION_SHARED_KEY: "${ENCRYPTION_KEY}"

      # Local LDAP / Active Directory
      LDAP_HOST: "ad.acme.local"
      LDAP_PORT: "636"
      LDAP_USE_LDAPS: "true"
      LDAP_BIND_DN: "CN=svc-cloudiam,OU=ServiceAccounts,DC=acme,DC=local"
      LDAP_BIND_PASSWORD: "${LDAP_PASSWORD}"
      LDAP_BASE_DN: "DC=acme,DC=local"
      LDAP_USER_SEARCH_BASE: "OU=Users"
      LDAP_USER_FILTER: "(&(objectClass=user)(sAMAccountName={0}))"
      LDAP_POOL_SIZE: "5"
      LDAP_TRUST_ALL_CERTIFICATES: "false"
    ports:
      - "127.0.0.1:8082:8082"  # local health endpoint, optional
Create a .env file next to it:
ENCRYPTION_KEY=K7m+xQ8z9LpVwX2nB4cR6tY1uI3oP5sA8dF7gH0jK9w=
LDAP_PASSWORD=<your service account password>
Start the agent:
docker compose up -d
docker compose logs -f connector-agent
For 3 or more Keycloak nodes, add BROKER_CONNECTIONS_2_URL, BROKER_CONNECTIONS_3_URL, ... using the URLs displayed in the console.
Verify the agent is healthy
The agent exposes a local health endpoint on port 8082:
curl -s http://127.0.0.1:8082/actuator/health | jqExpected output once everything is up:
{
  "status": "UP",
  "components": {
    "brokerHealth": {
      "status": "UP",
      "details": { "broker-0": "connected", "broker-1": "connected" }
    },
    "ldapHealth": { "status": "UP", "details": { "ldap": "reachable" } }
  }
}
What to check:
brokerHealthmust beUPwith everybroker-N: connected. A singledisconnectedentry means the agent failed to reach one of the brokers: check the URL, DNS and outbound 443.ldapHealthmust beUP. IfDOWN, the agent could not reach your AD with the bind credentials.
The console's Customisation > AD Agent page mirrors that status: the global badge shows Connected / Waiting / Disconnected, with one sub-line per broker reporting Reachable / Unreachable and whether the agent is currently connected to it.

Step 3: Connect Keycloak to your directory
Once your agent is running, the connector SPI is already installed in your Keycloak cluster. You only need to create a User Federation entry per realm.
- Open the Keycloak admin console:
https://{your-instance}.cloud-iam.com/admin - Select the realm where users should be federated.
- User federation > Add provider > cloud-iam-connector.
- Fill the fields:
| Field | Value |
|---|---|
| Name | cloud-iam-ldap (free-form) |
| Broker URL | http://ad-connector-broker:8081 |
| Base DN | DC=acme,DC=local |
| Username Attribute | sAMAccountName (AD) or uid (OpenLDAP) |
| Email Attribute | mail |
| First / Last Name Attribute | givenName / sn |
| User Object Classes | person,organizationalPerson,user (AD) or inetOrgPerson,organizationalPerson (OpenLDAP) |
| User LDAP Filter | (&(objectClass=user)(objectCategory=person)) (AD) |
- Click Save.
Broker URL must be the container name
The Broker URL is http://ad-connector-broker:8081, not 127.0.0.1 or your public domain. Keycloak and the broker share an internal Docker network on each Keycloak node, so the broker is reachable by its container name. Using 127.0.0.1 will fail with a ConnectException.
You can now try logging in with an AD account. The user is imported automatically into Keycloak with the federation link cloud-iam-ldap.
Rotate the encryption key
Rotate the shared key when:
- You lost the key (it is only shown once at activation).
- You suspect the key was exposed.
- You run a periodic rotation policy.
Procedure:
- In the Cloud-IAM console, open Customisation > AD Agent and click Rotate shared key. Type the confirmation phrase and confirm.
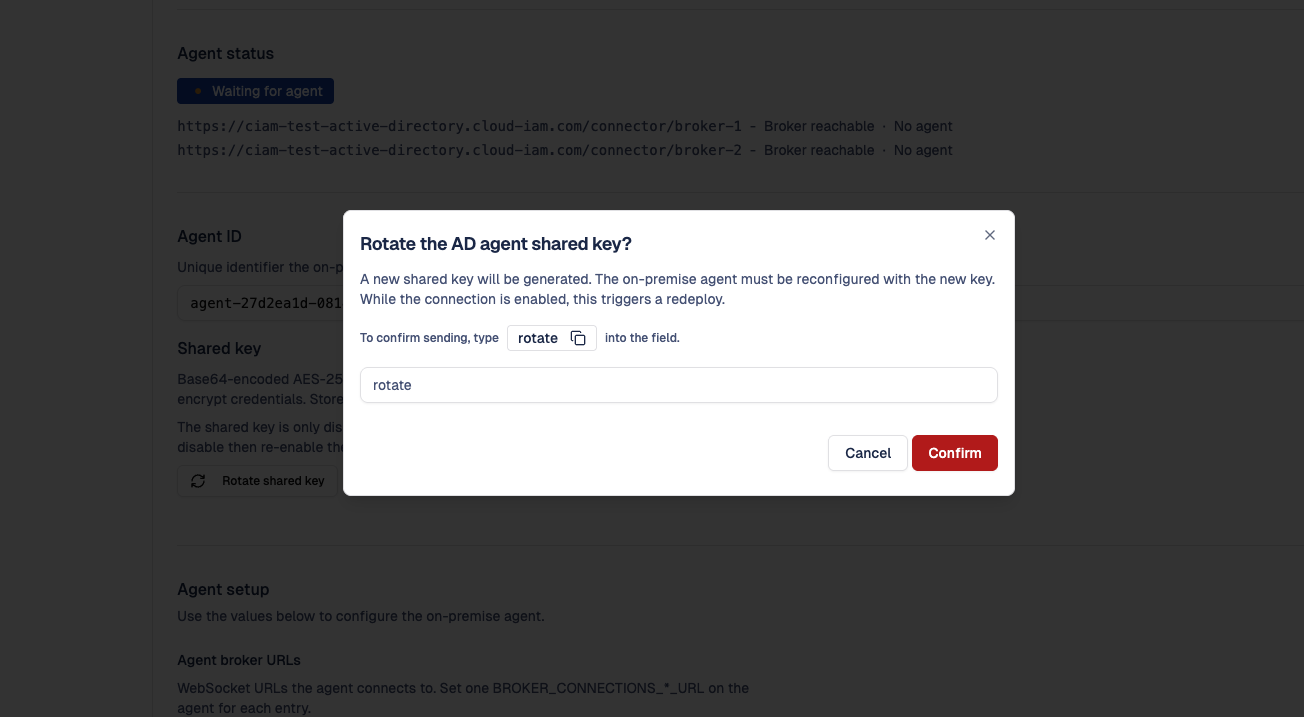
- The new key is returned and displayed in the console. Copy it immediately, it will not be re-displayed.
- Cloud-IAM propagates the new key to every broker in the background (a redeploy is triggered when the feature is enabled).
- Update
AGENT_ENCRYPTION_SHARED_KEYon your agent and restart it (docker compose restart connector-agent).
Plan the rotation
During the window between step 3 (key updated on Cloud-IAM side) and step 4 (key updated on your agent), authentications fail with Credential decryption failed. Plan the rotation outside peak login hours, or sequence it tightly.
Operating the agent
Restart and upgrade
The agent can be restarted at any time. Pending requests fail and are retried by Keycloak / Cloud-IAM automatically, and the agent reconnects within seconds.
To upgrade, update the image tag in your docker-compose.yml and run docker compose up -d. The agent is backwards compatible across minor versions.
Logs and metrics
Default log level is INFO. Enable debug logs when troubleshooting:
docker compose run --rm -e LOGGING_LEVEL_COM_CLOUDIAM_CONNECTOR_AGENT=DEBUG connector-agentEach broker connection prefixes its logs with [broker-0], [broker-1], ..., so you can tell which one is misbehaving.
Prometheus metrics are exposed on http://127.0.0.1:8082/actuator/prometheus. Useful series:
agent_broker_reconnects_total{broker="broker-0"}: reconnections per broker.agent_ldap_auth_duration_seconds: LDAP authentication latency.agent_ldap_auth_success_total/agent_ldap_auth_failure_total: success / failure counters.
Troubleshooting
A broker is reported as disconnected
The agent's /actuator/health shows broker-N: disconnected while the others are connected.
- The corresponding
BROKER_CONNECTIONS_N_URLis exactly the value displayed in the console (typo, missing/v1/connect, wrong subdomain). - The agent host has outbound access on port 443 to that URL:bash
curl -v https://{your-instance}.cloud-iam.com/connector/broker-N/api/v1/agents - Agent logs reveal the cause:bash
docker compose logs connector-agent | grep -i "\[broker-N\]"
The agent retries with exponential backoff (5s, then up to 60s), so it recovers automatically once the underlying issue is fixed.
Login fails with Credential decryption failed
The encryption key your agent uses does not match the key your Keycloak deployment expects. The value must be exactly the 44-char base64 string displayed at the last activation or rotation.
# What the agent currently has
echo "$AGENT_ENCRYPTION_SHARED_KEY"
If the value looks corrupted (extra spaces, missing padding) or you do not have it anymore, click Rotate shared key in the console to issue a fresh one, then update the agent and restart it.
Login fails with user not found for a known AD user
The agent ran the LDAP search but got no result. Check, in order:
LDAP_BASE_DNandLDAP_USER_SEARCH_BASEactually contain the user.LDAP_USER_FILTERmatches the user (the placeholder{0}is replaced by the login).- Enable debug logs and look for
LOOKUP_REQUEST: filter='...'. Run the same filter directly withldapsearchto confirm:bashldapsearch -H ldaps://ad.acme.local:636 \ -D "CN=svc-cloudiam,OU=ServiceAccounts,DC=acme,DC=local" -W \ -b "OU=Users,DC=acme,DC=local" \ "(&(objectClass=user)(sAMAccountName=jdoe))"
ldapHealth is DOWN
The agent cannot reach your AD.
- The host running the agent has network access to
LDAP_HOST:LDAP_PORT. - The bind account credentials are correct and not locked.
- If
LDAP_USE_LDAPS=trueand your AD uses a private CA, install the CA certificate in the agent's trust store, or setLDAP_TRUST_ALL_CERTIFICATES=truefor testing only.
Reconnects in a loop
Common causes:
- An intermediate proxy or firewall enforces a short WebSocket idle timeout. Ask your network team to allow long-lived outbound WebSocket connections to port 443.
- A maintenance window on Cloud-IAM side; the agent reconnects automatically once it ends.
- TLS certificate renewal; the agent picks up the new chain on the next connect.
If reconnects never stabilize, capture 5 minutes of logs at DEBUG level and open a support ticket.
Security notes
- The bind account in your AD only needs read access. Do not grant write or admin privileges.
- Store the encryption key as a secret (Docker secret, vault, sealed file). Do not commit it to a Git repository.
- The agent does not expose any inbound port on the public internet. The local port 8082 is for health and metrics only, and should be bound to
127.0.0.1(as in the example above). - All cloud-bound traffic is TLS only (WebSocket over HTTPS, port 443).
Configuration reference
| Variable | Required | Default | Description |
|---|---|---|---|
AGENT_ID | yes | agent-01 | Unique identifier provided by Cloud-IAM |
BROKER_CONNECTIONS_*_URL | yes | (none) | One WebSocket URL per broker, 0-based index |
AGENT_ENCRYPTION_SHARED_KEY | yes | (none) | Base64 AES-256 key shared with your Keycloak deployment |
LDAP_HOST | yes | localhost | LDAP / AD hostname |
LDAP_PORT | no | 636 | LDAP port (389 plain, 636 LDAPS) |
LDAP_USE_LDAPS | no | true | Enable LDAPS |
LDAP_USE_STARTTLS | no | false | Enable StartTLS (alternative to LDAPS) |
LDAP_BIND_DN | yes | (none) | DN of the read-only service account |
LDAP_BIND_PASSWORD | yes | (none) | Password of the service account |
LDAP_BASE_DN | yes | (none) | Base DN where users live |
LDAP_USER_SEARCH_BASE | no | (none) | Sub-tree to search (e.g. OU=Users) |
LDAP_USER_FILTER | no | (uid={0}) | Filter that matches a user by login |
LDAP_POOL_SIZE | no | 5 | Number of pooled LDAP connections |
LDAP_TRUST_ALL_CERTIFICATES | no | false | Trust self-signed certs (testing only) |
Pass these values as environment variables in your docker-compose.yml (uppercase, underscore separated, as in the example above).
Support
If you run into issues that are not covered above, open a support request from the Cloud-IAM console and include:
- The output of
curl -s http://127.0.0.1:8082/actuator/health. - The last 200 lines of the agent logs at
DEBUGlevel. - The agent version (visible in the logs at startup).
- The exact LDAP filter and the username you tested with.