Keycloak Realms Concept
What Is a Realm in Keycloak?
A realm in Keycloak represents an isolated identity and security domain. It is the highest-level boundary used to define users, applications, security policies, and authentication behavior. All identities and access decisions are evaluated within a realm context, and objects defined in one realm are completely isolated from those in another.
A realm defines who can authenticate, how authentication is performed, and what users are allowed to access. It acts as a container that hosts applications (called clients in Keycloak), users, roles, groups, and identity providers. Each client belongs to one and only one realm, ensuring clear separation of identity and access scope.
During authentication, a user always authenticates to a realm first. Once authenticated, the user may access one or more applications defined inside that realm, depending on assigned roles and permissions. Realms can be managed through the Keycloak Admin Console or programmatically using the Keycloak Admin API, which is commonly used for automation and infrastructure-as-code workflows.
Realm Isolation, Security Boundaries, and Design Choices
Realms provide strong logical isolation within a single Keycloak deployment. This isolation ensures that identities, credentials, permissions, and security policies defined in one realm cannot affect or interact with another realm.
Because realms are fully isolated, a user does not exist globally in Keycloak. If the same person must access applications in multiple realms, they will have separate user accounts, one per realm, each with its own credentials, sessions, and permissions.
This isolation model is commonly used to:
- separate environments (development, staging, production)
- isolate tenants in multi-tenant architectures
- separate workforce identities from customer identities
- enforce different authentication or security requirements
- meet compliance or regulatory constraints
- delegate administration to different teams
Creating a new realm is appropriate when strong isolation is required. If such isolation is not needed, using a single realm with groups, roles, or organizations is often simpler and easier to operate.
Choosing the right realm strategy is a key architectural decision that directly impacts security, user experience, and operational complexity.
![[Keycloak Diagram] - Keycloak Realm](/assets/keycloak-diagram-realm-structures.BxyxwrC4.png)
The Master Realm (Platform Administration Realm)
Keycloak includes a special realm called the Master realm, which acts as the administrative control plane of the Keycloak instance.
The Master realm is created automatically during Keycloak installation and cannot be removed. It is required for the proper operation of the platform and for managing all other realms.
The Master realm is specifically used to:
- create, update, and delete other realms
- authenticate global administrators
- grant and manage realm-level administrative permissions
- access platform-wide management features
Unlike regular realms, the Master realm is not designed to host application users or business identities. It should be kept strictly for platform administration purposes.
Best practice is to:
- restrict access to the Master realm to a very small number of trusted administrators
- avoid configuring clients, users, or identity providers for business use cases
- create dedicated realms for customer, workforce, or application identities
This separation ensures a clear boundary between platform administration and identity management, reducing security risks and operational complexity.
What Belongs to a Realm
A realm defines the full identity context for authentication and authorization.
Within a realm, you configure:
- Users and their attributes
- Groups and organizational structure
- Roles and permission models
- Clients representing applications and APIs
- Identity Providers (IdPs) for federation and brokering
- Authentication flows (password, MFA, WebAuthn)
- Security settings such as token lifetimes and session policies
All authentication and authorization decisions are evaluated within the realm context.
Realms and Identity Use Cases
Realms are commonly used to structure identity management according to different functional and security requirements. The same Keycloak instance can support multiple use cases by separating them into dedicated realms.
CIAM (Customer Identity and Access Management)
In CIAM scenarios, a realm usually represents a customer-facing identity domain. These realms are designed to handle large user populations and to support self-service features such as registration and password reset.
They often integrate with social login providers or external IdPs and require strict privacy controls, including consent management and user profile customization. Using a dedicated realm allows CIAM-specific security policies and data models without impacting internal identities.
WIAM (Workforce Identity and Access Management)
In WIAM scenarios, a realm is used to manage employee and internal user identities. These realms typically contain fewer users but enforce stronger security requirements due to elevated privileges.
Authentication often includes MFA or device-based controls, and access is managed through role-based authorization. Auditability and compliance are usually key drivers, which is why workforce realms are kept isolated from customer-facing identities.
Multi-Tenant and B2B Scenarios
In multi-tenant or B2B architectures, realms can be used to isolate tenants, business units, or partner ecosystems. This approach provides strong separation of identities and security policies.
In some cases, a single realm combined with organizations and groups is sufficient, especially when full isolation is not required. The choice between multiple realms and a shared realm depends on security requirements, compliance constraints, and operational complexity.
Realm Scope in Authentication, Configuration, and Administration
In Keycloak, all authentication and token requests are scoped to a realm. The realm is always explicitly referenced in authentication endpoints, ensuring that sessions and tokens are evaluated only within the specified realm.
Example authentication endpoint:
https://{keycloak-url}/realms/{realm}/protocol/openid-connect/authA realm also defines global configuration that applies to all users and clients within it, including authentication policies, session timeouts, token lifetimes, event and audit settings, and identity provider configuration. Changes made at the realm level have a global impact and should be carefully controlled.
Realm administration follows the same isolation model. Administrative access is scoped per realm and managed through the Keycloak Admin Console or the Keycloak Admin API. An administrator may have full permissions in one realm and no access to another, enabling delegated administration and secure operational separation.
Configuration
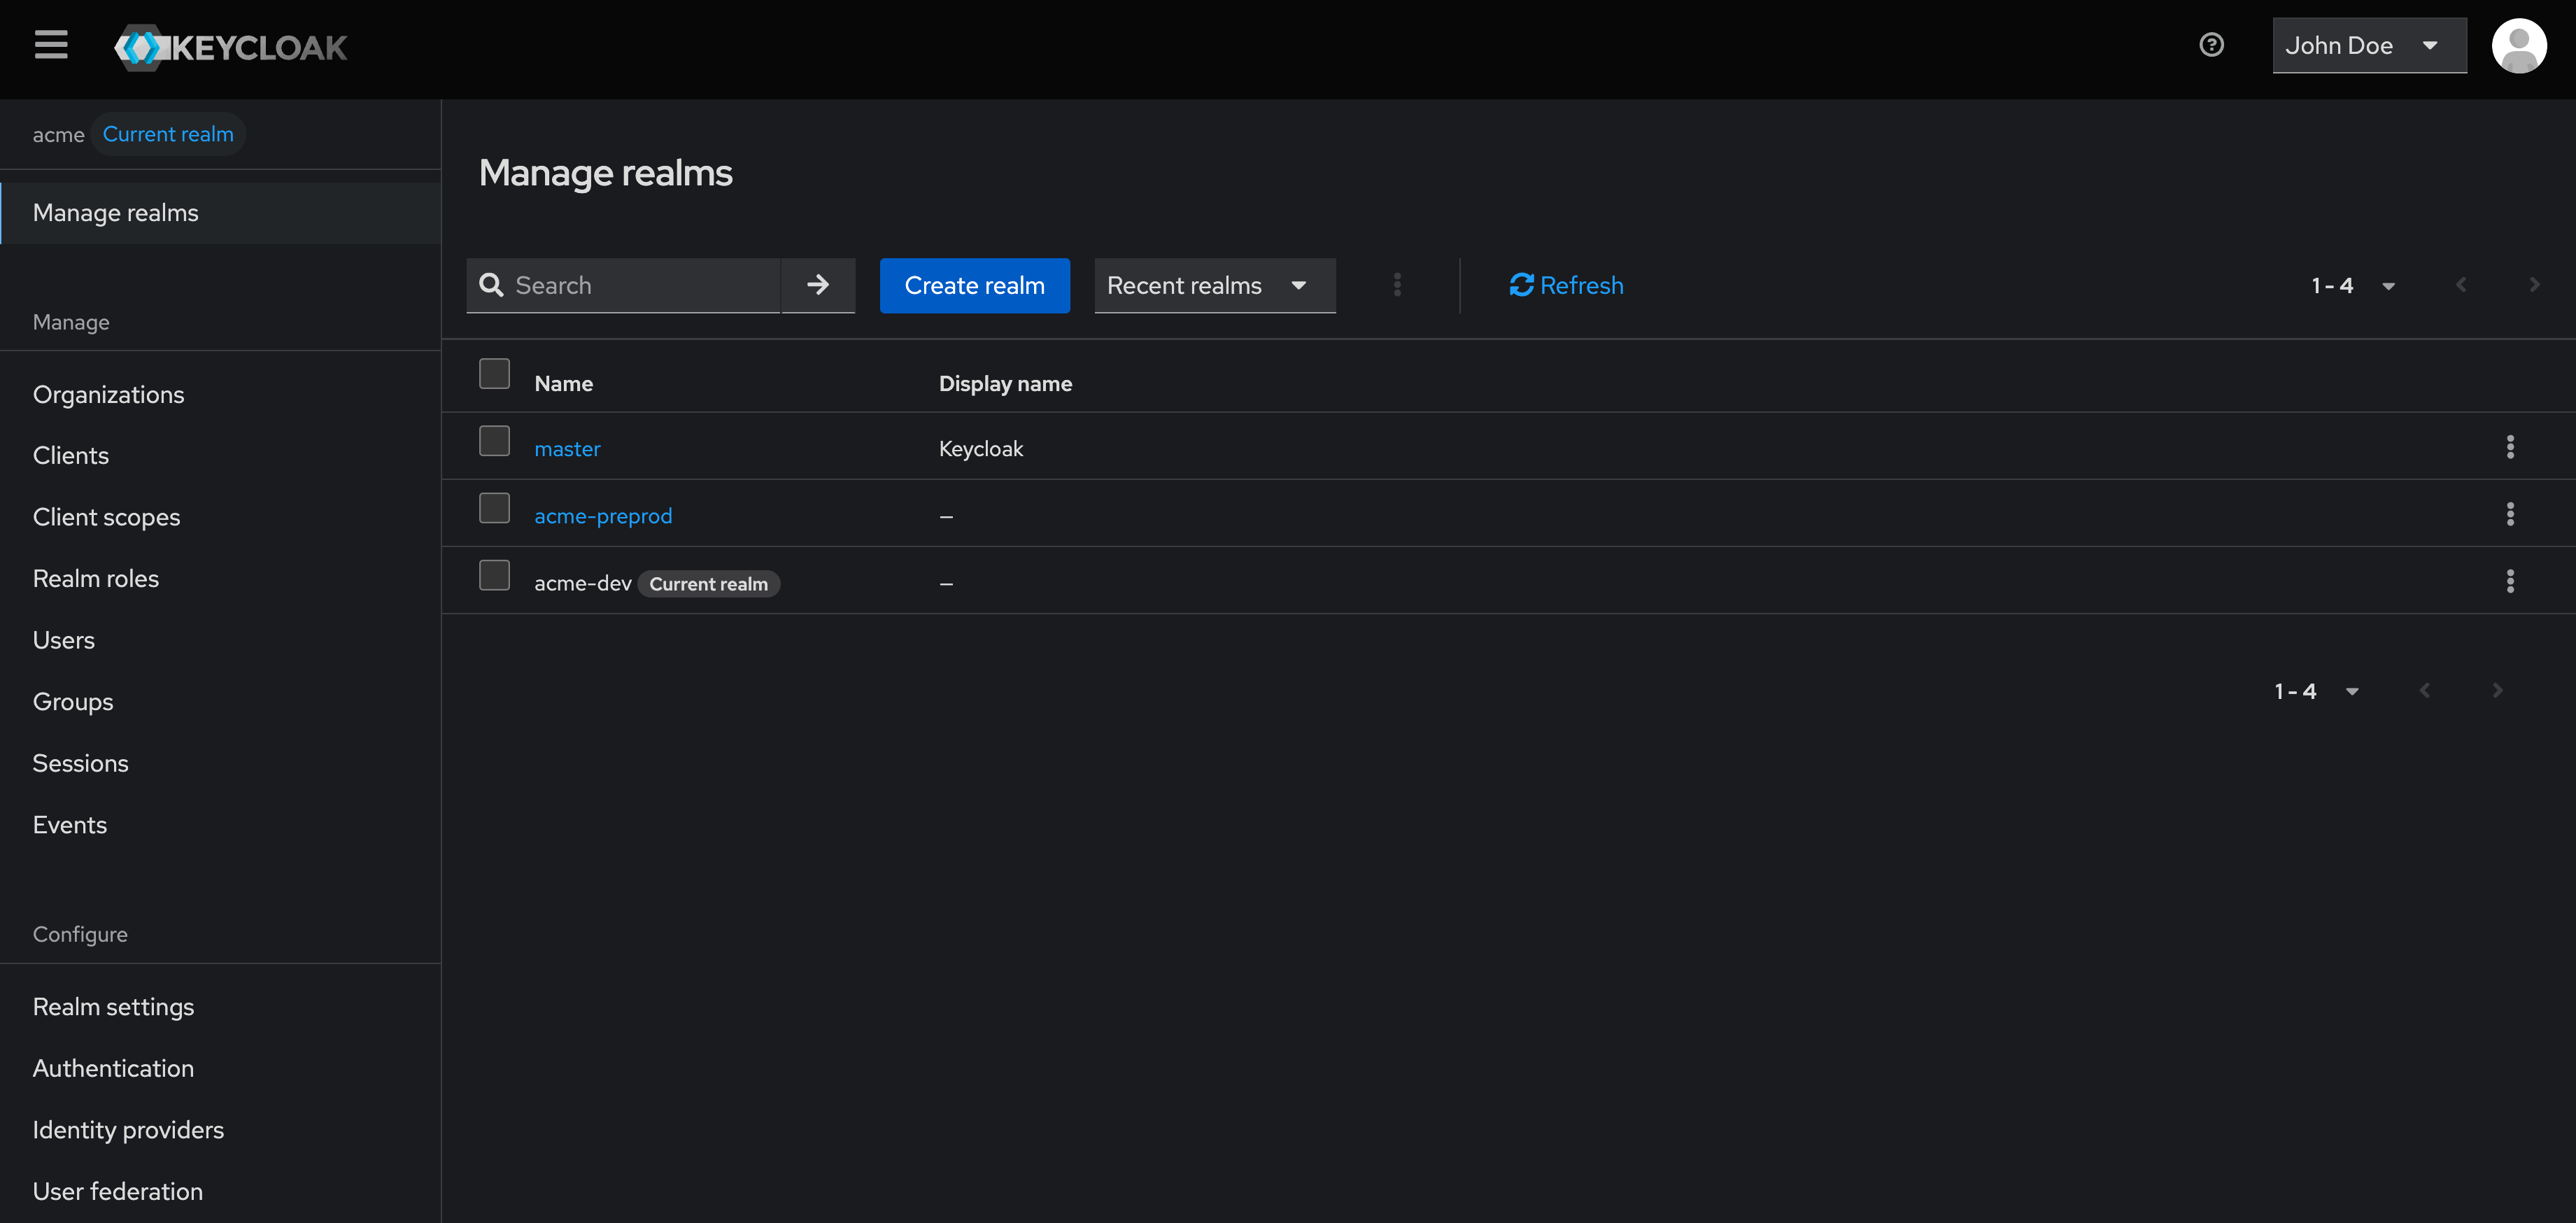
How to Create a Realm in Keycloak
This tutorial explains how to create a realm using the Keycloak Admin Console. This approach is typically used during initial setup or manual administration.
This tutorial does not cover advanced multi-tenant or automation scenarios.
Step 1 — Access the Realm Selector
- Log in to your Keycloak as Admin
- In the top-left corner select
Manage Realms - Then click
Create realm

Step 2 — Configure Realm Information
- Fill in the Realm name (example:
acme) - Confirm by clicking
Create
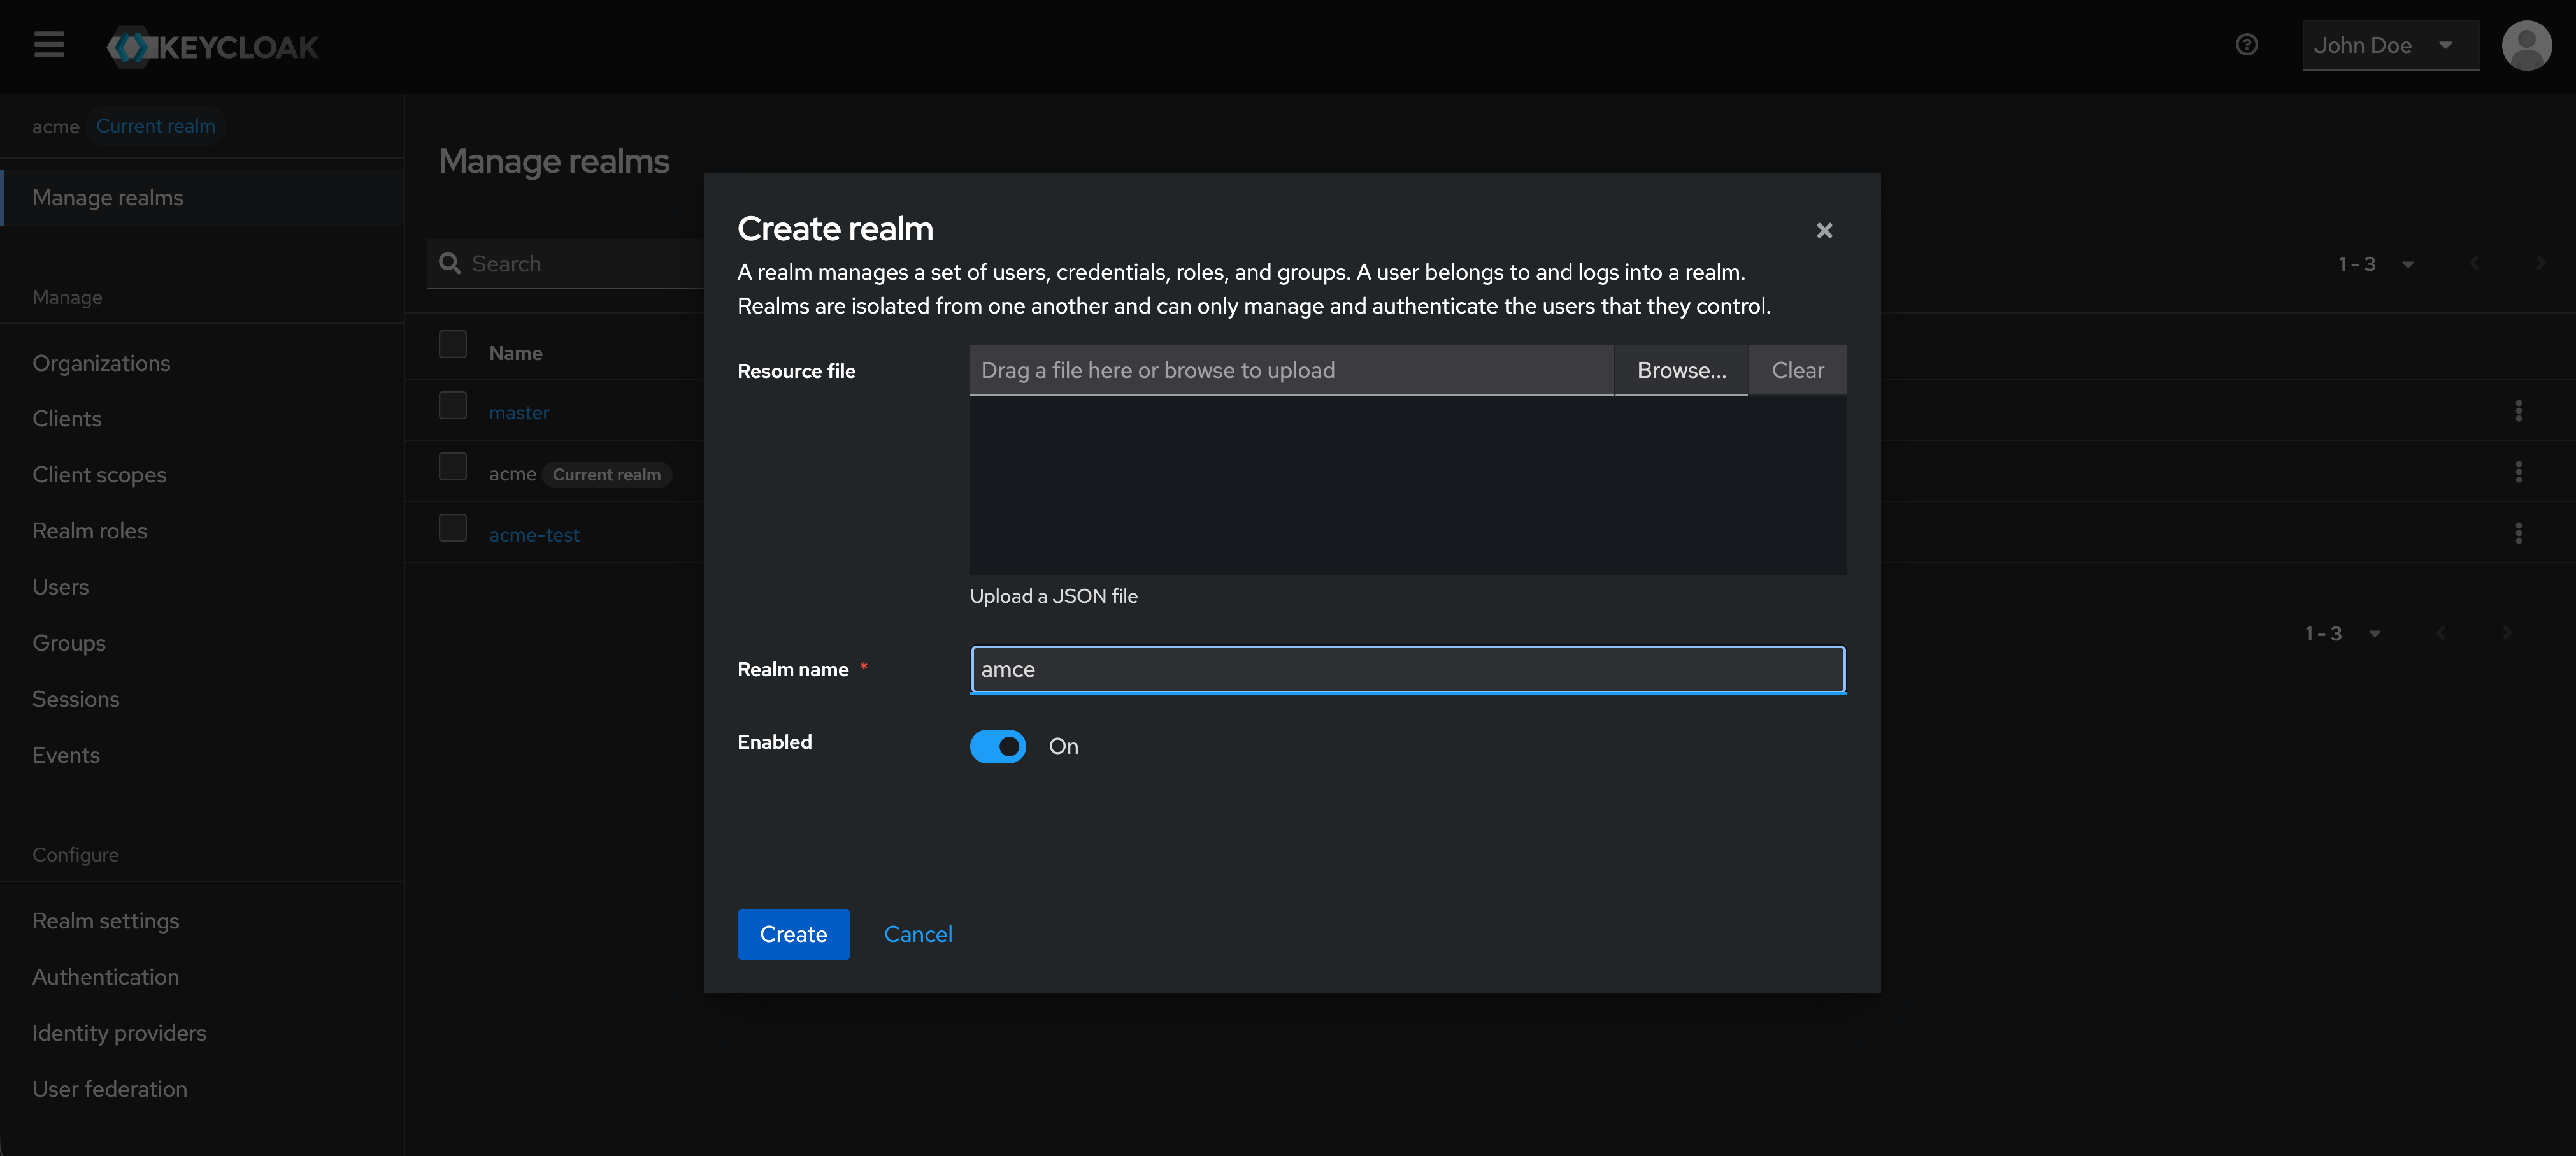
The realm is now created and ready to be configured.
How to Modify the display name of your Realm in Keycloak
This tutorial explains how to change the display name of your realm using the Keycloak Admin Console. This approach is typically used during initial setup, important note: this operation will not modify the URL of your realm, only the display name will be modified.
This tutorial does not cover advanced multi-tenant or automation scenarios.
Step 1 — Access the Realm settings
- Login to your Keycloak as an admin
- Select the realm to be change (here: acme)
- Navigate to
Realm settingssection
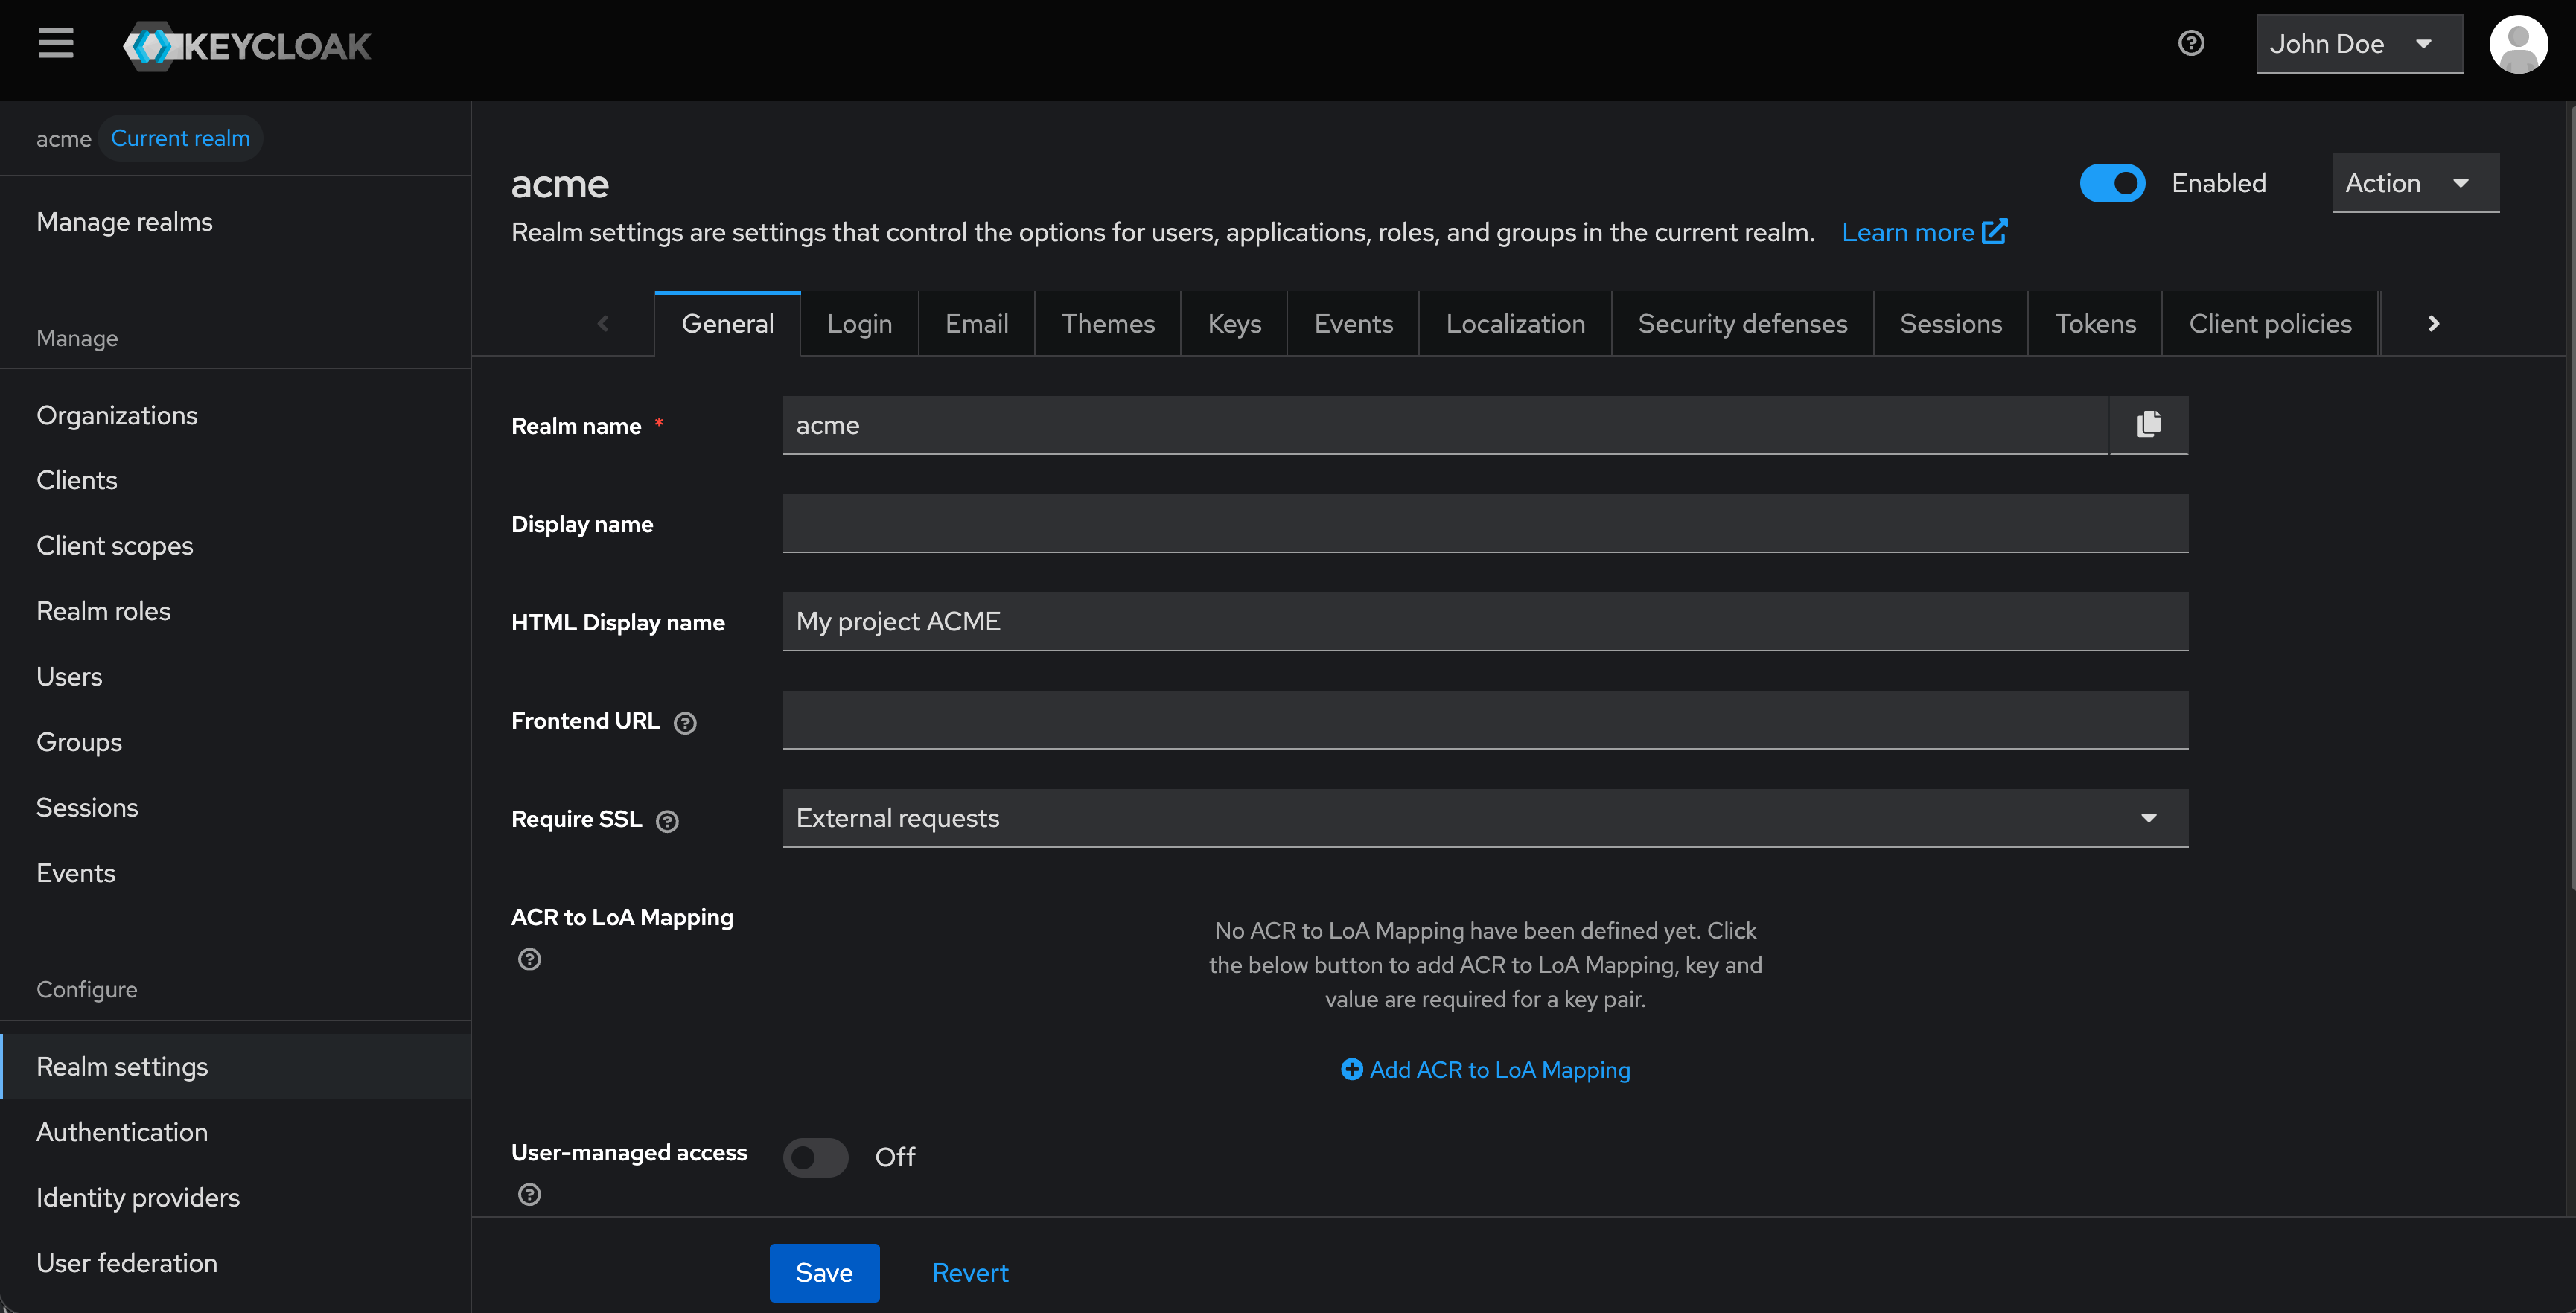
Step 2 — Configure the realm display name
- Fill in the HTML Display name (example:
My project ACME) - Confirm by clicking
Save
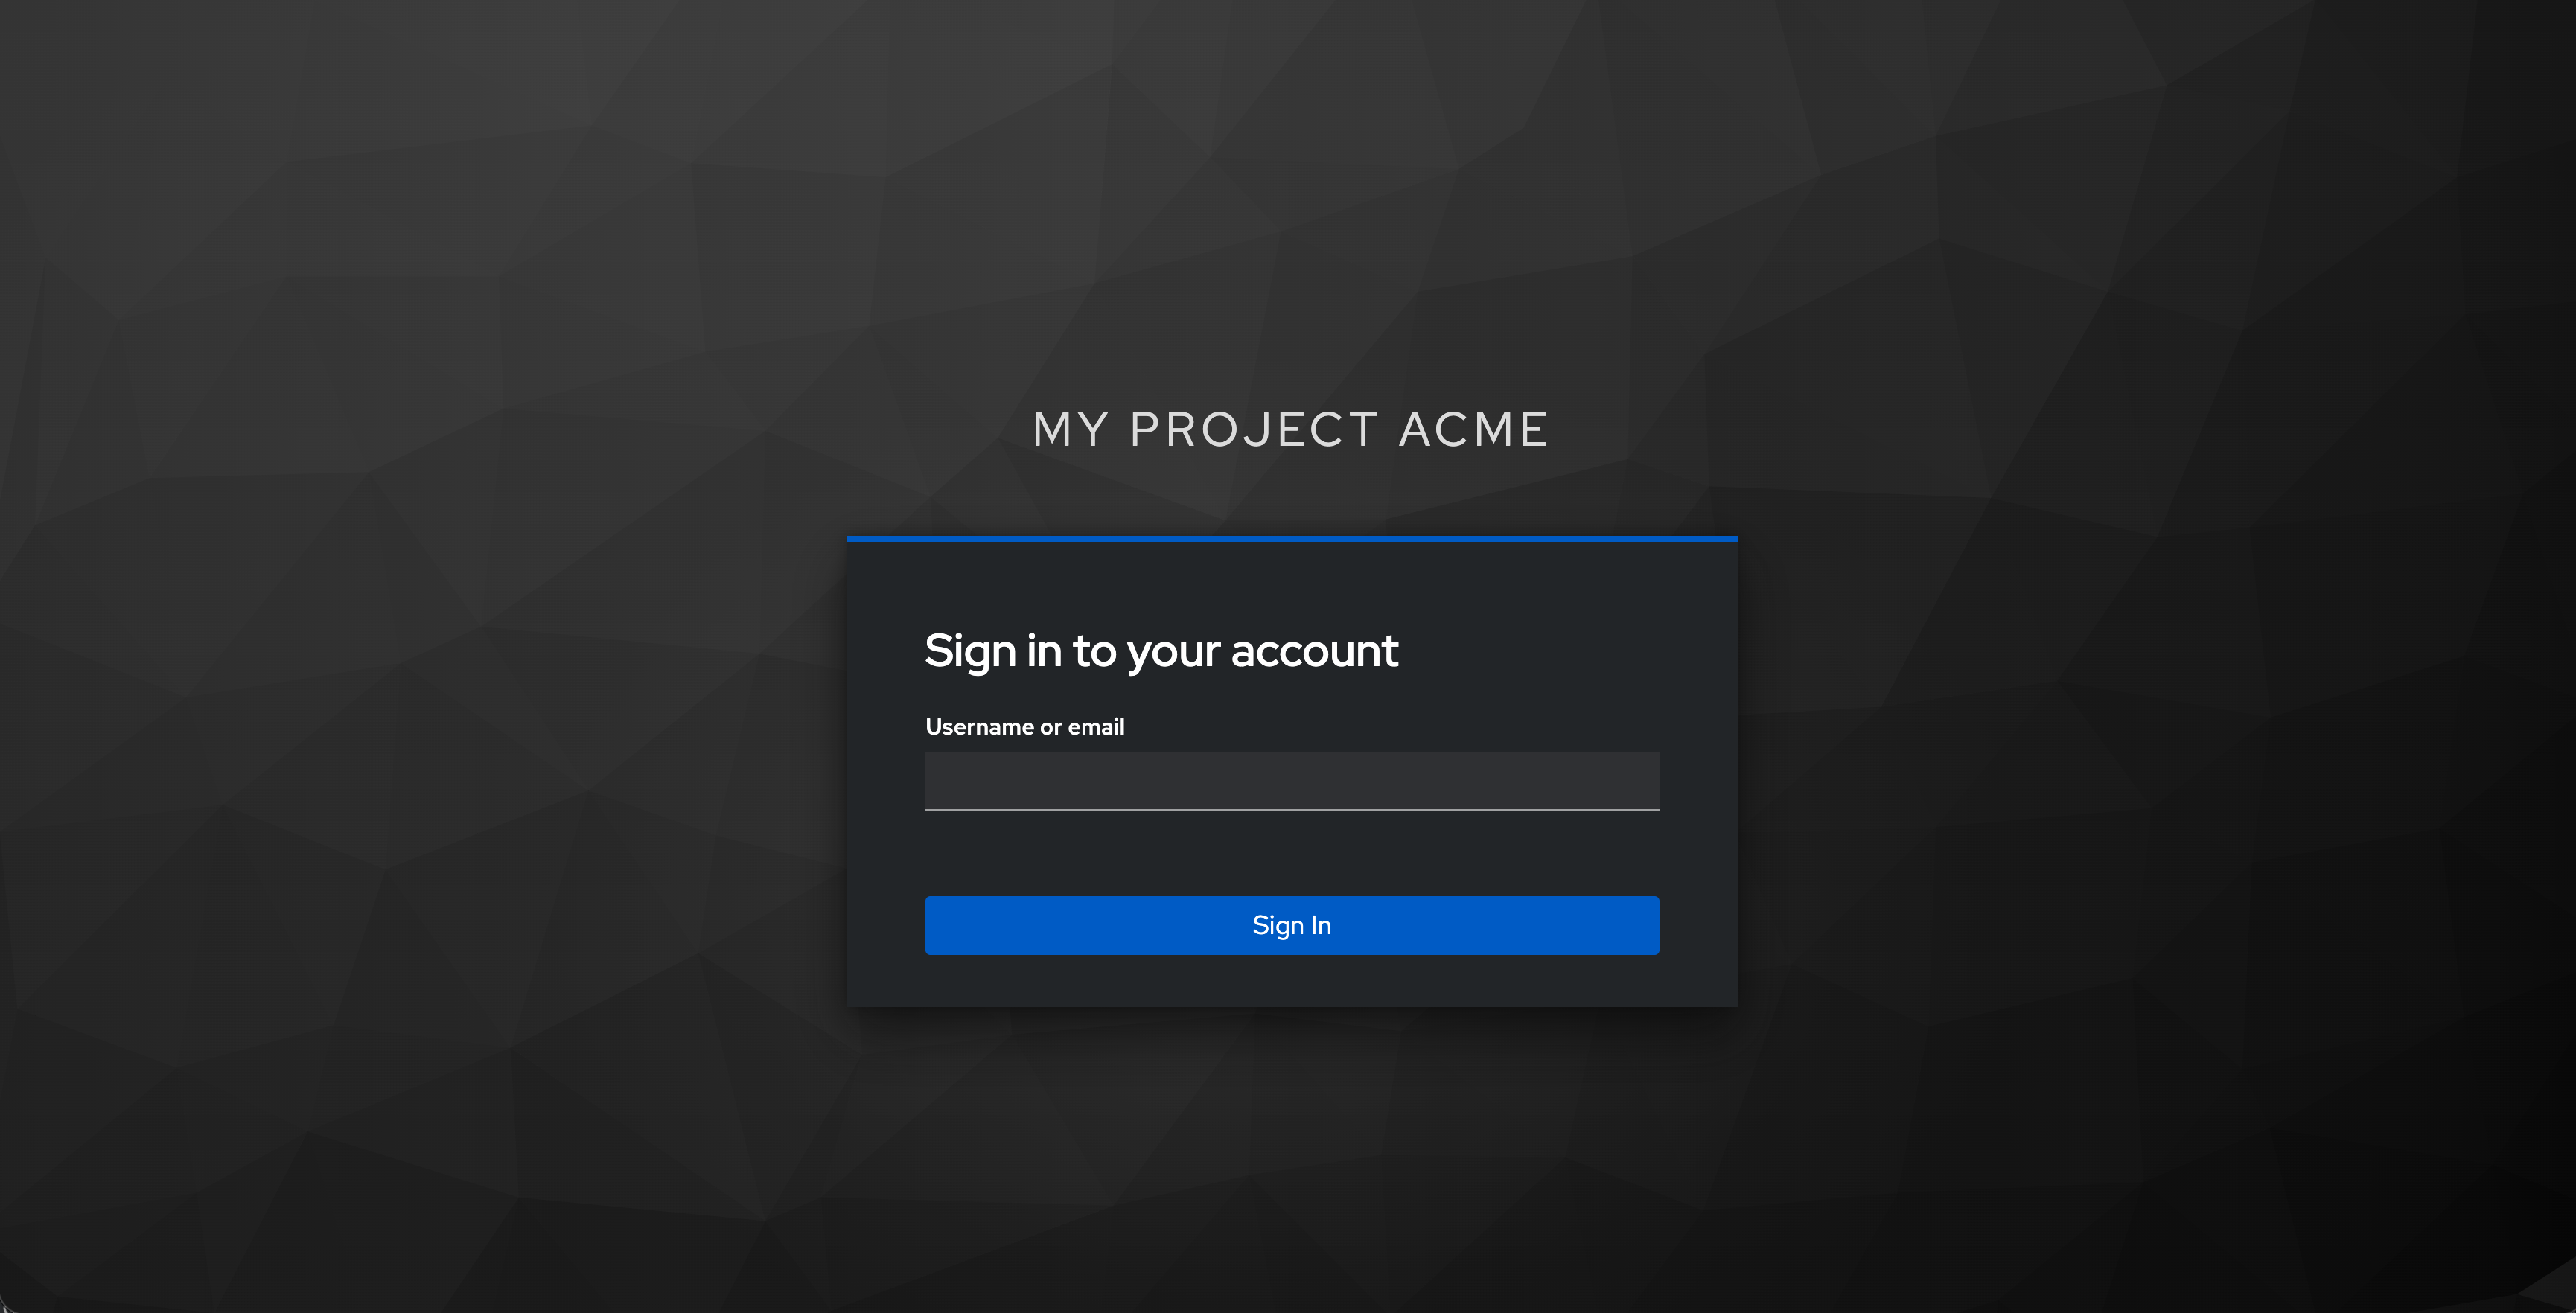
The new display name now appear on the login form.