Migrate to Cloud-IAM
Migrating from a self-hosted Keycloak instance to Cloud-IAM’s fully managed service usually involves exporting your complete Keycloak configuration. This can include some or all of your current realms, users, client settings, user federation, and any custom extensions.
There is no one-size-fits-all migration approach. The best method depends on factors such as your specific use case, usage patterns, Keycloak version, database size, customizations, infrastructure, and acceptable downtime.
Cloud-IAM’s technical and Keycloak expert teams are here to help you identify the migration method that fits your needs best. They will provide detailed guidance and support throughout the entire migration process, regardless of the approach you choose.
Keycloak export as JSON
Overview
This migration method leverages Keycloak’s built-in export/import functionality to transfer your configuration and data to your Managed Keycloak on Cloud-IAM. It is ideal for small deployments that can afford a data freeze lasting a few hours during the migration window.
How it works?
This process is fully customer-managed, allowing you to control timing and execution without external assistance.
- You export your existing Keycloak realm data as a JSON file from your self-hosted instance.
- You import this JSON file into your Cloud-IAM Managed Keycloak deployment via the Keycloak console.
- After a successful import, you redirect your applications to use the new Cloud-IAM deployment (commonly done via DNS changes).
Important considerations
- Database type: Works with any Keycloak-supported database as it relies on export/import JSON files, not direct database dumps.
- Downtime: Requires a data freeze of a few hours while the export/import takes place. Not suitable for deployments requiring zero downtime.
- Deployment size: Best suited for small to medium-sized deployments; the process is slow and inefficient for large databases.
- Management: Entirely autonomous; customers can handle the export and import steps themselves without needing Cloud-IAM support.
- Cost: No additional cost from Cloud-IAM for this migration method since it is self-service.
- Compatibility: The export/import process requires compatible Keycloak versions between source and Cloud-IAM target deployments to avoid import errors.
- Custom extensions and themes: Custom Keycloak extensions or theme configurations will require manual configuration before or after the import into Cloud-IAM.
How to proceed?
For this tutorial we will export and import a Realm from your on-premises Keycloak to manged Keycloak by Cloud-IAM.
Step 1 - Export your realm from your self-hosted Keycloak deployment
To prepare for import .json, you first need to export your realm configuration from your self-hosted Keycloak.
You have two options:
- Option 1: Use the CLI export command
Run the Keycloak full export command to export all realm data as a single.jsonfile.
or
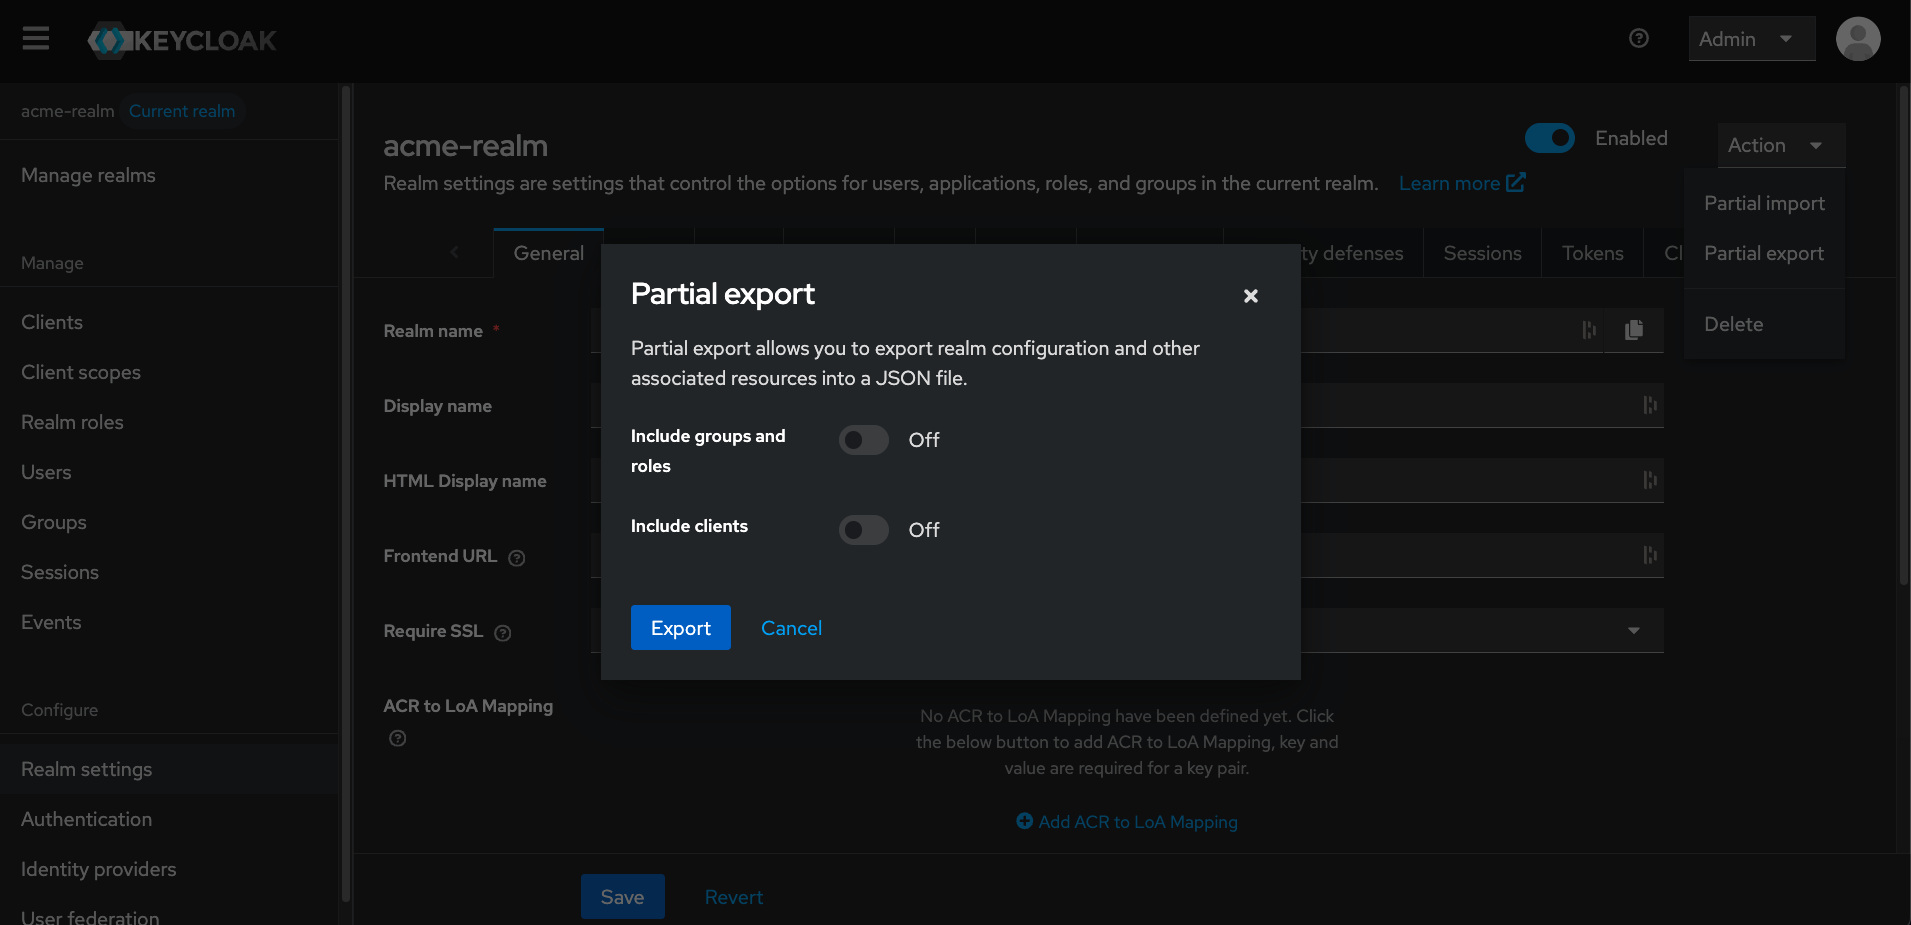
- Option 2: Use the Keycloak Admin Console
- Open your on-premised Keycloak and log in
- Navigate to
realm settings - Open the
Actiondropdown - Click on
Partial export - Select the data you want to export (e.g. groups, roles, clients)
- Then click on
Export
After a few moments, Keycloak will generate a .json file containing your realm configuration.
Step 2 - Import the exported .JSON file into your Managed Keycloak deployment
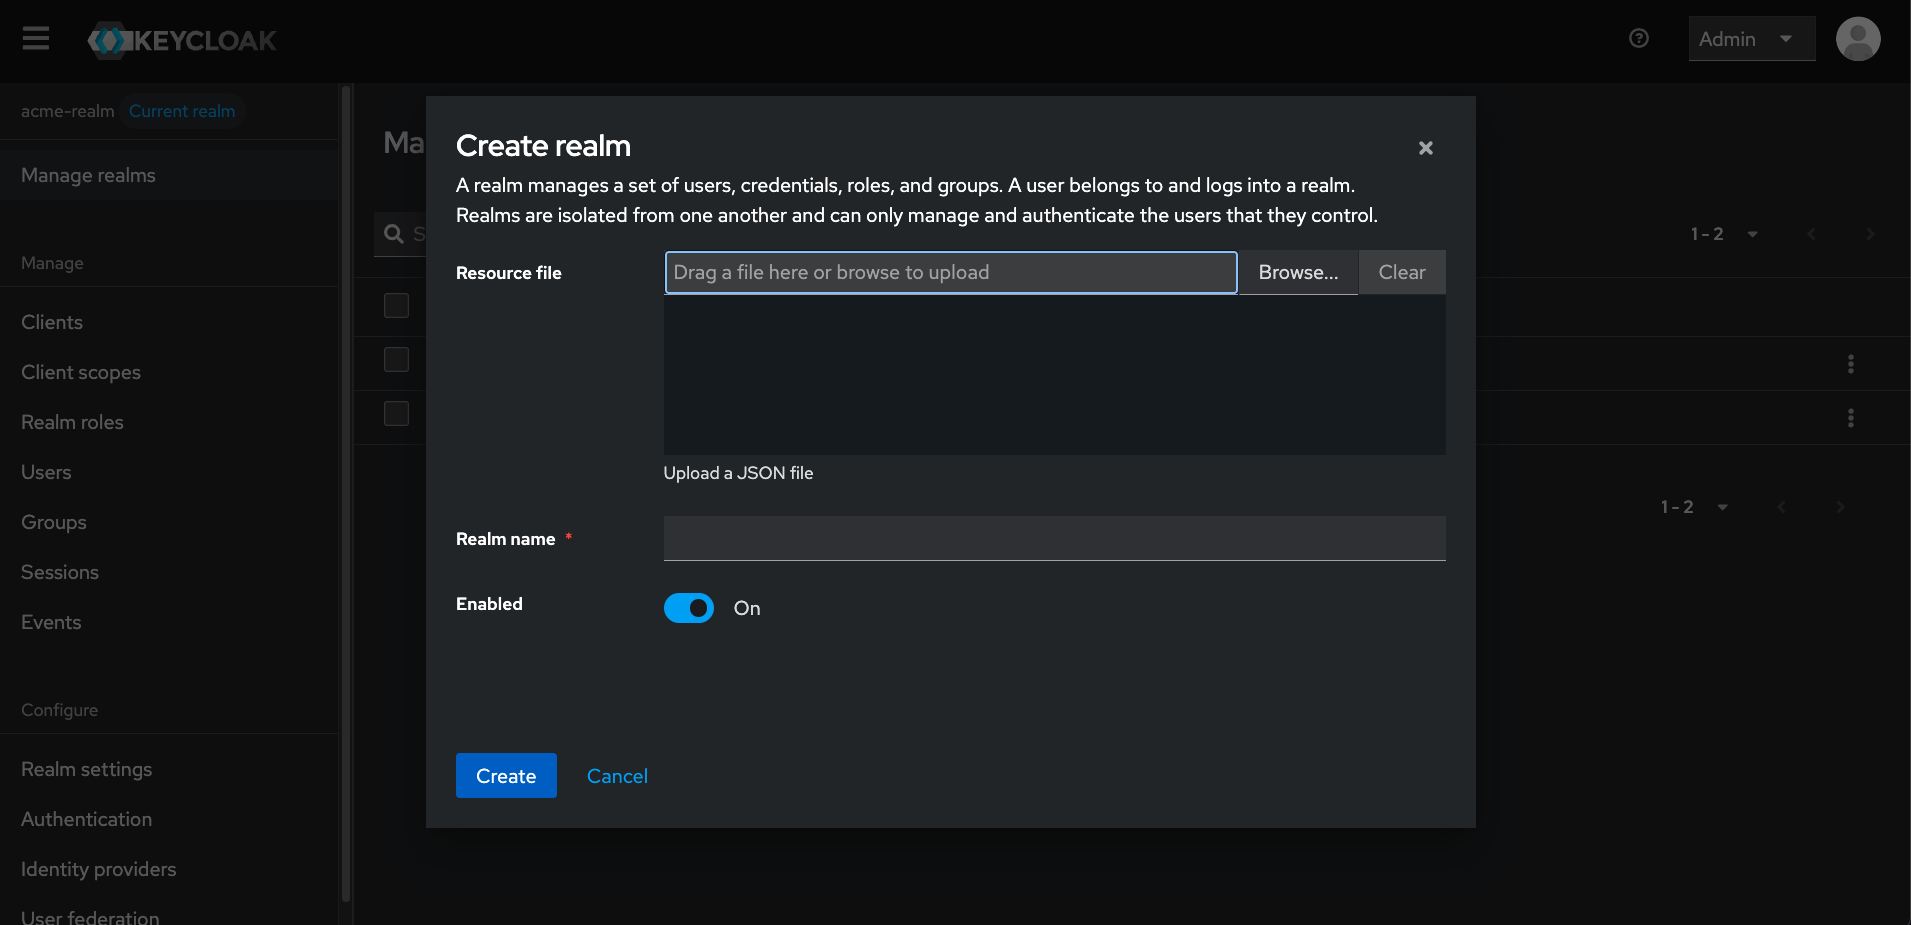
- Open Cloud-IAM console
- Select the Keycloak deployment you want to receive the export.
- Click on
Keycloak consoleand log in - Click on
Manage realms - Select
Create realm - In the Resource file, click on
Browseand upload your exported.jsonfile - Name your realm, then click
Create
You’ve successfully imported your Keycloak data into your Managed Keycloak!
Partial import?
The Keycloak console may label the operation as a Partial import, but it fully supports importing entire realms from standard exported .json files.
Script upload is disabled error?
When importing your export file, you might see a Script upload is disabled error, this depends on the Keycloak version used in your export.
To resolve it, enable “Write custom authenticators using JavaScript” in the Configuration tab of your Cloud-IAM dashboard.
Database dump
Overview
This migration method uses a direct database dump to transfer your Keycloak data to Cloud-IAM. It is designed for large deployments that can tolerate a planned downtime of about an hour during migration.
This process requires coordination with the Cloud-IAM technical team and cannot be fully customer-managed.
How it works:
- You create a PostgreSQL database dump of your current Keycloak database.
- You encrypt dump file with Cloud-IAM’s GPG key and securely transferred to Cloud-IAM support.
- Cloud-IAM support schedules and performs the import on your Managed Keycloak deployment, which involves stopping the Managed Keycloak deployment temporarily.
- After a successful import, you redirect your applications to use the new Cloud-IAM deployment (commonly done via DNS changes).
Two-stage migration process
Because this migration can be complex, we can organize it in two stages:
- The first stage takes place during business hours and allows time to test the process, review configuration, and validate the setup over few days.
- The second stage is scheduled at a time that best suits your needs (e.g., evenings or weekends) to generate a fresh dump, finalize the migration and switch production traffic.
This phased approach ensures a smoother and more controlled transition.
Important considerations
- Database type: Only PostgreSQL database dumps are supported for this migration method.
- Downtime: Requires planned downtime of about one hour during the import process while the deployment is stopped and restarted.
- Deployment size: Ideal for large deployments where other migration methods are too slow or impractical.
- Management: The migration must be coordinated and performed by the Cloud-IAM support team; it is not self-service.
- Cost: This is a managed migration service and might involve additional fees billed to the customer depending on the support level.
- Compatibility: Source and target Keycloak versions should be compatible to ensure a smooth import process without errors.
- Custom extensions and themes: Custom Keycloak extensions or theme configurations will require manual configuration before or after the import into Cloud-IAM.
How to proceed?
Step 1 - Contact Cloud-IAM Support
- Open a support ticket to schedule the migration
- Cloud-IAM's team will provide instructions and will validate your migration use case
- Cloud-IAM's team will share their GPG key, and coordinate the migration timeline
Step 2 - Prepare the Database Dump
- Export your PostgreSQL Keycloak database
- Encrypt the dump file using the Cloud-IAM GPG key before transfer.
Step 3 - Transfer the Dump Securely
- Send the encrypted database dump to the Cloud-IAM support team using the secure method provided by the team.
Step 4 - Import & Deployment Update
- Cloud-IAM's team will stop your Managed Keycloak deployment temporarily.
- Cloud-IAM's team will import the database and restart the deployment.
Step 5 - Validate & Switch Over
- Cloud-IAM's team will notify you of the success of the import and restart
- You can now verify that the deployment is working correctly.
- Update your application(s) to point to the new Cloud-IAM Keycloak endpoint (typically via a DNS switch).
You’ve successfully imported your Keycloak data into your Managed Keycloak!
Progressive import
The progressive import method is ideal for large deployments that cannot tolerate any downtime.
Instead of migrating all data at once, this approach transfers user data incrementally, as users log in. The migration continues until all active users have authenticated at least once in the new Cloud-IAM environment.
During the migration period, the legacy Keycloak will have to remain fully operational and continue to serve users who have not yet logged in to the new deployment.
How it works
- Your new Cloud-IAM deployment is configured to connect to your legacy Keycloak database via user federation.
- A custom extension provided by Cloud-IAM intercepts login attempts and progressively migrates user data to the new environment in real time.
- Users who do not log in during the migration window can be migrated later manually, through a specific bulk import, or removed.
- Over time, your deployment is fully migrated as more users authenticate.
Important considerations
- Database type: No specific requirement; works regardless of the database used in your legacy Keycloak.
- Downtime: No downtime required. Users are migrated seamlessly during authentication.
- Management: This method is managed by the Cloud-IAM support team.
- Cost: This method requires support team support and the provision of a custom extension, which will be billed to the customer. Please contact Cloud-IAM for pricing and scheduling.
- Compatibility: Source and target Keycloak versions should be compatible to ensure a smooth import process without errors.
- Custom extensions and themes: Custom Keycloak extensions or theme configurations will require manual configuration before or after the import into Cloud-IAM.
- Migration duration: The migration duration depends on user login frequency depending on the use cases this can range from a few months to more than a year. Users who do not log in remain on the legacy system.
How to proceed?
Step 1 - Contact Cloud-IAM support
- Open a support request to initiate a progressive migration. This process requires coordination and access to your existing Keycloak infrastructure.
Step 2 - Prepare your Legacy Keycloak
- Ensure your self-hosted Keycloak database is accessible and compatible with federation (typically requires stable network access and a supported database).
- Cloud-IAM's team will provide and configure a custom extension that intercepts logins and transfers user data securely to your new deployment.
Step 3 - Configure Your New Keycloak Deployment and Set Up User Federation
- Set up your new environment with all the rules and configurations from your legacy Keycloak. This process can be completed using a database dump.
- Cloud-IAM's team will assist in setting up user federation in your new Managed Keycloak deployment to connect with your legacy Keycloak database.
Step 4 - Start the Progressive Migration
- As users begin to log in, their accounts, credentials, and metadata are migrated in real time. This happens silently and without interruption to the user.
Step 5 - Complete the Migration
- After a predefined period, users who have not logged in will have to be addressed through manual imports, bulk campaigns, or deprovisioning.
Step 6 - Finalize and Decommission
- Once all necessary users have been migrated, you can decommission the legacy Keycloak environment.
You’ve successfully imported your Keycloak data progressively into your Managed Keycloak!
Bulk user Import via .CSV
This method uses a custom Cloud-IAM extension built on Keycloak’s import capabilities to migrate users from a .csv file into your Managed Keycloak environment.
It’s ideal for scenarios where only a list of users, optionally including attributes or group mappings, is required. And short data freeze (typically a few hours) is acceptable during the import window.
This approach can be used for one-time migrations or as part of a long-term process to keep your user list up to date.
How it works
- You define and share to Cloud-IAM support the exact structure of the
.csvfile, including all fields to be imported (e.g.,username,first name,date of birth,email,roles, etc.) - Cloud-IAM support creates and adapts a custom extension based on the fields provided by the customer
- Cloud-IAM support deploys the custom extension tailored to your data format and import requirements in your Managed Keycloak environment and provides you with the API endpoint
- You upload your
.csvfile to the dedicated API endpoint exposed by the custom extension - The extension automatically converts the
.csvdata into Keycloak-compatibleJSONand imports it into your Managed Keycloak instance.
Important considerations
- Database type: No specific requirement;
- Downtime: Requires a data freeze of a few hours while the import takes place. Not suitable for deployments requiring zero downtime.
- Management: This method is managed by the Cloud-IAM support team and customer.
- Cost: This method requires support team support and the provision of a custom extension, which will be billed to the customer. Please contact Cloud-IAM for pricing and scheduling.
- Compatibility: No specific requirement;
- Custom extensions and themes: Custom Keycloak extensions or theme configurations will require manual configuration before or after the import into Cloud-IAM.
How to proceed?
Step 1 - Contact Cloud-IAM support
- Open a support request to initiate a .csv transfer. This step requires collaboration to define your .csv file structure and coordinate the import.
Step 2 – Define your .csv file structure
- Provide Cloud-IAM support with the exact details and format of your .csv file, including all fields to be imported (e.g.,
username,first name,date of birth,email,roles, etc.).
This ensures the custom extension matches your data requirements.
Step 3 – Custom extension development and deployment
- Cloud-IAM support will create and deploy a custom extension tailored to your .csv file structure and import needs within your Managed Keycloak environment.
- You will receive the API endpoint to upload your .csv file.
Step 4 – Upload your .csv file
- Upload your .csv user data file to the dedicated API endpoint exposed by the custom extension.
Step 5 – Automatic data conversion and import
- The custom extension will convert the .csv file into Keycloak-compatible JSON and import the users into your Managed Keycloak instance.
This process is generally fast but may vary depending on the number of users and the complexity of the fields being imported.
You have now successfully imported your user data via .csv into your Managed Keycloak!