Identity Provider Open ID Connect
Overview
Connecting your Keycloak with an external Identity Providers allows users to log in to applications using their existing accounts, such as Azure AD, Microsoft Entra ID, another Keycloak,... This provides a convenient and streamlined login experience for users while also enabling applications to leverage the user's existing identity from an existing identity provider.
Use cases
Corporate IAM / WIAM (Workforce Identity and Access Management)
For internal applications, integrating with identity providers such as Azure AD and Microsoft Entra ID centralizes user management and simplifies access control. This is particularly useful in corporate environments where employees use various enterprise applications.
IdP broker
As an Identity Provider broker, Keycloak can facilitate authentication across multiple IdPs, enabling flexible and scalable identity federation. This is ideal for organizations needing to support multiple authentication sources for their users.
Pros & cons
Pros
- Seamless user experience: Easily connect with widely-used IdPs like Azure AD and Microsoft Entra ID, providing a familiar login experience for users.
- Enhanced security: Leverage the advanced security features of established IdPs, including multi-factor authentication and conditional access policies.
- Scalability: Support for multiple IdPs allows for scalable identity federation across diverse user bases.
Cons
- Complex configuration: Initial setup and configuration with external IdPs can be complex and may require detailed knowledge of both Keycloak and the external IdP.
- Dependency on external services: Relying on external IdPs introduces a dependency that may affect availability and performance if the external service experiences issues.
Supported by Keycloak
Yes, natively supported on Managed Keycloak by Cloud-IAM
Configuration
How to connect Azure AD / Microsoft Entra ID to Keycloak
The following tutorial provides a quick example of configuring the "Azure AD / Microsoft Entra ID Authentication" method to help you navigate Keycloak and test it with Microsoft Azure (https://portal.azure.com/).
This tutorial does not cover all the necessary security best practices for a complete configuration.
Keycloak Console - Create new Identity Provider (OIDC)
- Open your Keycloak
- Select your realm from the dropdown list (here: tutorial-demo)
- Click on
Identity provider(1.) - Then click on
OpenId Connect v1.0(2.)
![[Keycloak Console] - Create new Identity Provider (OIDC)](/assets/microsoft-entra-id-step1.VFGZorSb.png)
Keycloak Console - Configure new Identity Provider (OIDC)
- Register your alias (here: azuread-entraid)
- Register your Display Name (here: Azure AD & Entra ID)
- Disable
Use discovery Endpoint - Copy the
Redirect URI(here: https://your-keycloak/auth/realms/tutorial-demo/broker/azuread-entraid/endpoint)
![[Keycloak Console] - Configure new Identity Provider (OIDC)](/assets/microsoft-entra-id-step2.C961HeV8.png)
Azure Portal - Access to Microsoft Entra ID / Azure AD
- On another window browser, Go to Microsoft - Azure Portal
- Connect yourself with your Microsoft account credentials
- Click on Menu
- Click on
Microsoft Entra ID, (Your url should be: https://portal.azure.com/#view/Microsoft_AAD_IAM/ActiveDirectoryMenuBlade/~/Overview) - Then click on
App registrations
![[Azure Portal] - Microsoft Entra ID Overview](/assets/microsoft-entra-id-step3.BQfvz-rf.png)
Azure Portal - Configure Microsoft Entra ID / Azure AD
- Select
New registration - Register the name (here: Keycloak Tutorial)
- Make sure that only
Accounts in this organizational directory onlyis selected - From
Select a platformlist, select "Web" - Paste the previous Redirect URI (here: https://your-keycloak/auth/realms/tutorial-demo/broker/azuread-entraid/endpoint)
- Then click on
Register
You have now register your Keycloak app on Microsoft Entra ID / Azure AD.
![[Azure Portal] - Configure Microsoft Entra ID / Azure AD](/assets/microsoft-entra-id-step4.B7VDeLzm.png)
Azure Portal & Keycloak Console - Configure Authorization URL and Token URL
- Click on
Endpoints - Copy / paste URL from Azure portal
OpenID Connect metadata documentto KeycloakDiscovery endpoint(1.) - Verify that the OpenID metadata is correctly configured by clicking on
Show metadata(2.) - Make sure
Client secret sent a postis selected on Client authentication list (3.)
![[Azure Portal] - Configure Microsoft Entra ID / Azure AD](/assets/microsoft-entra-id-step5.DxNAs93s.png)
Azure Portal & Keycloak Console - Configure Client ID
- Close the
Endpointswindow - Copy / paste from the overview of Azure portal
Application (client) IDto KeycloakClient ID
![[Azure Portal] - Configure Client ID](/assets/microsoft-entra-id-step6.BjdSD14p.png)
Azure Portal & Keycloak Console - Configure Client Secret
- On Azure portal, click on
Managelist (1.) - Click on
Certificate & secrets(2.) - Select
New client secret(3.) - Register a description (here: keycloak secret) (4.) and keep the recommendation of client secret expiration (180 days)
- Click on
Add(5.) - Copy / paste from the certificates & secrets of Azure portal
Valueto KeycloakClient Secret(here: 987654321-abcd) - Then on Keycloak Console click on
Add
![[Azure Portal] - Certificate & secrets](/assets/microsoft-entra-id-step7.BqF7rH_T.png)
![[Azure Portal / Keycloak Console] - Configure client secret](/assets/microsoft-entra-id-step8.CQXXNsBI.png)
Keycloak Console - Define scope to be extracted from Microsoft Entra ID / Azure AD
- Select
Advanceto deploy the list (1.) - Register on
Scopessection, "openid profile email" (2.) - Then click on
Save(3.)
![[Keycloak Console] - Define scope from Microsoft Entra ID / Azure AD](/assets/microsoft-entra-id-step9.1BKB7euw.png)
Advance settings - Access token is JWT
Pay attention that Access tokens provided during the authentication are not signed but the same public key as the refresh tokens. You can not validate it directly and thus you can not enable the Access token is JWT switch on Azure AD/Entra ID configuration.
![[Keycloak Console] - Advance settings - disable](/assets/warning-access-token-jwt.BBdWs6iF.png)
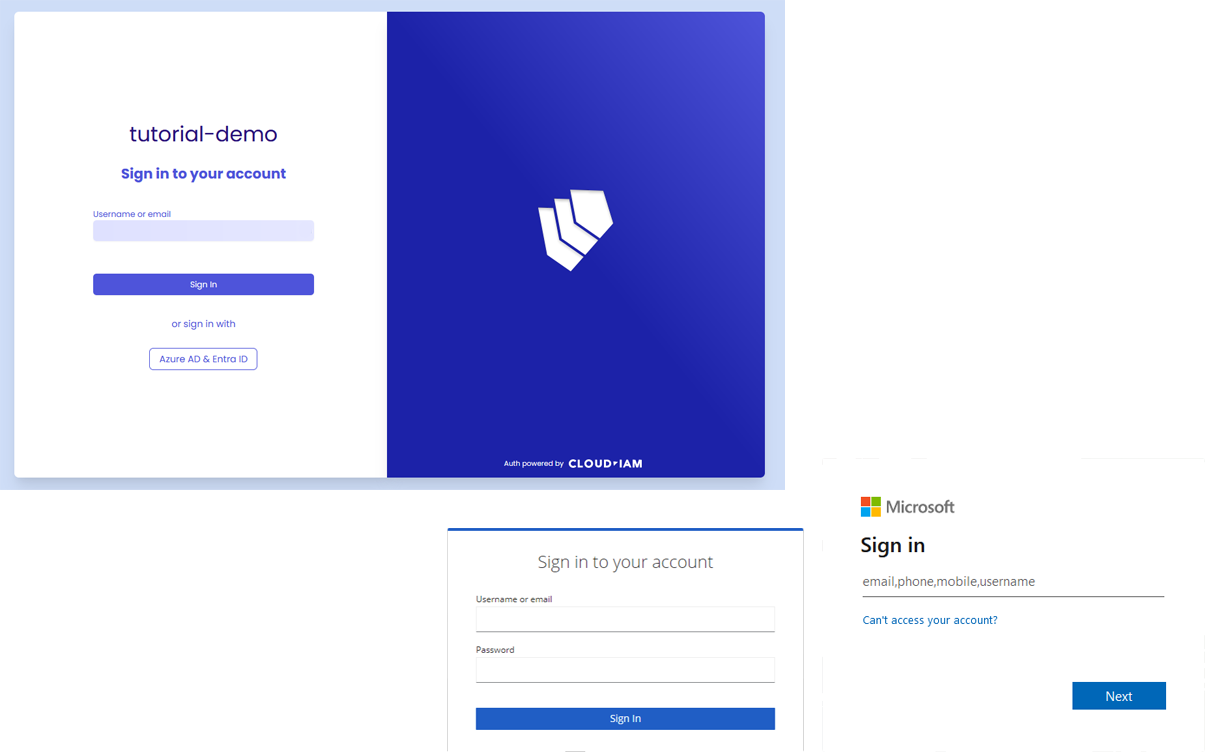
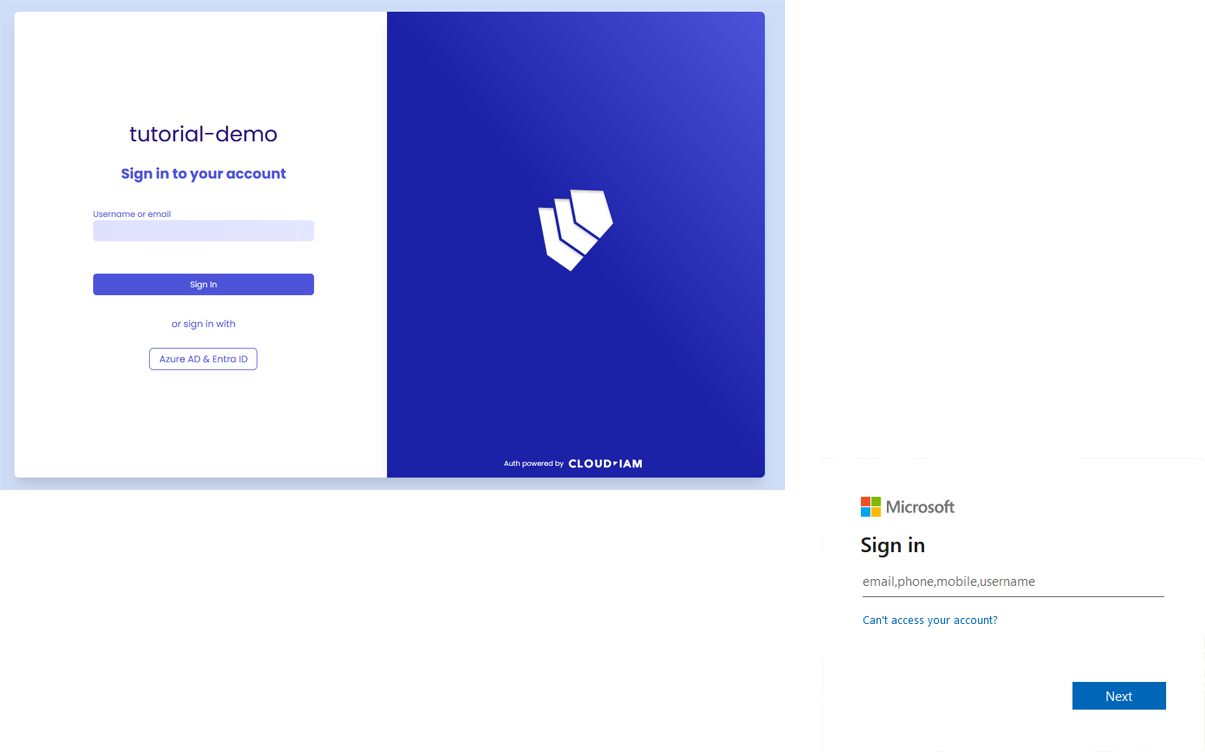
Access token is JWT disableKeycloak login screen - Microsoft Entra ID / Azure AD
You have now connected your Microsoft Entra ID / Azure AD to your keycloak via OIDC. Users registered on your Microsoft Entra ID / Azure AD can now connect themselves with their Microsoft credentials through your Keycloak.
How to connect Keycloak to Keycloak
The following tutorial provides a quick example of configuring the "Keycloak to Keycloak Authentication" method to help you navigate Keycloak. Please notice that this tutorial does not cover all the necessary security best practices for a complete configuration.
For this tutorial, we will assume that you already have 2 Keycloak (here: Keycloak A and Keycloak B), and you want to use your keycloak B as Identity Provider, which you want to connect to keycloak A.
Keycloak Console (A) - Create new Identity Provider (OIDC)
- Open your Keycloak A
- Select your realm from the dropdown list (here: tutorial-demo)
- Click on
Identity Provider(1.) - Then click on
Keycloak OpenID Connect(2.)
![[Keycloak Console] - Add Identity Provider (OIDC)](/assets/keycloak-to-keycloak-step1.BF7uJtbr.png)
Keycloak Console (B) - Create a new client
- On another window browser, Open your Keycloak B
- Select your realm from the dropdown list (here: test-tutorial)
- Click on
Clients(1.) - Then click on
Create client(2.)
![[Keycloak Console] - Create a new client](/assets/keycloak-to-keycloak-step2.7uSLsvCD.png)
Keycloak Console (B) - Configure your new client
- Register the
Client ID(here: keycloak-b-idp ) - Click on
Next - Enable
Client Authentication(1.) - Disable
Direct access grants(2.) - Click on
Next
![[Keycloak Console] - Configure your new client](/assets/keycloak-to-keycloak-step3.J9LhCBb8.png)
Keycloak Console (B) - Configure login settings
- Copy / paste from Keycloak A
Redirect URIto Keycloak BValid redirect URIs - Register "+" on
Valid post logout redirect URIs - Register "+" on
Web origins - Then click on
Save
You have now created a new client on your Keycloak B.
![[Keycloak Console] - Configure login settings](/assets/keycloak-to-keycloak-step4.tv9aVojK.png)
Keycloak Console (A) - Configure your Identity Provider
- Go back on your Keycloak A
- Rename
Alias(here: keycloak-to-keycloak) - Copy / paste from Keycloak B
Client IDto Keycloak AClient ID(here: Keycloak-b-idp) - On Keycloak B, click on
Credential - Copy / paste from Keycloak B
Client Secretto Keycloak AClient Secret
![[Keycloak console] - Configure your Identity Provider](/assets/keycloak-to-keycloak-step5.B0Vm1YJO.png)
Keycloak Console (B)- Configure Endpoint
- Go back on your Keycloak B
- Click on
Realm Settings(1.) - Copy / paste the link from Keycloak B
OpenID Endpoint Configurationto Keycloak ADiscovery endpoint(2.) - Then click on
Addfrom your Keycloak A. (3.)
You have now created and configured a new Identity Provider Keycloak A.
![[Keycloak console] - Configure endpoint](/assets/keycloak-to-keycloak-step6.x4CtG6eR.png)
Keycloak login screen - Keycloak to Keycloak
You can now connect yourself from Keycloak A to Keycloak B via OIDC. Users registered on your Keycloak B can now connect themselves with their Keycloak B credentials through your Keycloak A.
![[Keycloak console] - Keycloak to Keycloak](/assets/keycloak-to-keycloak-step7.VaEhGosg.png)