Keycloak Theme Generator
What is Keycloak theme generator
The Keycloak Theme Generator is a no-code solution that enables you to visually customize the appearance of your Keycloak login pages directly from the Cloud-IAM Console. It allows you to apply your organization's branding, such as logos, colors, fonts, and layout, without writing any code.
By default, Keycloak includes three themes: base, keycloak, and keycloak.v2. While these provide a functional user interface, they lack visual customization and branding options. To deliver a consistent and professional user experience, most organizations prefer to create custom themes that align with their design guidelines.
With Cloud-IAM’s Theme Generator, you can personalize the look and feel of your Keycloak instance directly from the Cloud-IAM Console. This tool is upgrade-safe, resilient, and designed for non-technical users who want fast results.
How to create Keycloak login theme in Cloud-IAM
In Cloud-IAM-managed Keycloak deployments, you have two powerful options for customizing your Keycloak login experience:
Use the Theme Generator (No-Code)
The Theme Generator is built into the Cloud-IAM Console and allows you to:
- Customize your Keycloak login pages using a visual editor
- Modify background styles, images, colors, gradients, and button shapes
- Add your company logo and favicon
- Preview changes instantly in real time with WYSIWYG editor
- Ensure compatibility with future Keycloak upgrades
- Apply your theme with a single click
This approach is ideal for most teams that need fast, simple, and upgrade-safe customizations. Cloud-IAM's Theme Generator is designed for ease of use, making it the fastest way to personalize your Keycloak login experience.
Cloud-IAM Maintains Your Theme Compatibility
When you use the Theme Generator, Cloud-IAM automatically ensures your custom theme stays compatible with future Keycloak versions.
You design it once — we handle the upgrades and maintenance behind the scenes. 👌
Custom Keycloak Extension (Advanced)
For advanced use cases that require deep customization, Cloud-IAM also supports custom Keycloak themes via extensions.
This option is better suited for developers and includes:
- Writing
.jarfiles that implement Keycloak SPIs (Service Provider Interfaces) - Using open-source tools like Keycloakify or the Cloud-IAM Keycloak Theme
- Creating dynamic content, logic-driven UI behavior, and custom templates
More details are available in the Keycloak Custom Theme Guide.
What are the prerequisites to use theme generator feature on Cloud-IAM
Before you can start customizing your Keycloak login pages with the Theme Generator, make sure the following requirements are met:
- Dedicated Keycloak Deployment: The Theme Generator is only available on dedicated Keycloak deployments with a paid Cloud-IAM plan. It is not supported on shared or freemium environments.
- User Permissions: You must have the Editor role assigned to your Cloud-IAM organization account in order to upload, modify, or delete themes. Learn more in the Organization Roles guide.
- Minimum Keycloak Version: Your deployment must be running Keycloak version 26.2 or higher. The Theme Generator feature is not available on older versions.
Once these prerequisites are met, you can begin customizing your Keycloak interface directly from the Cloud-IAM Console using the no-code Theme Generator.
How to create your theme in the Cloud-IAM Console
To configure your custom login theme, follow these steps:
- Open Cloud-IAM console
- Select the Keycloak deployment where you want to create the theme
- Navigate on the
Customisationsection - Select the
Generatortab - Click
Create theme - Register a name for your theme and click
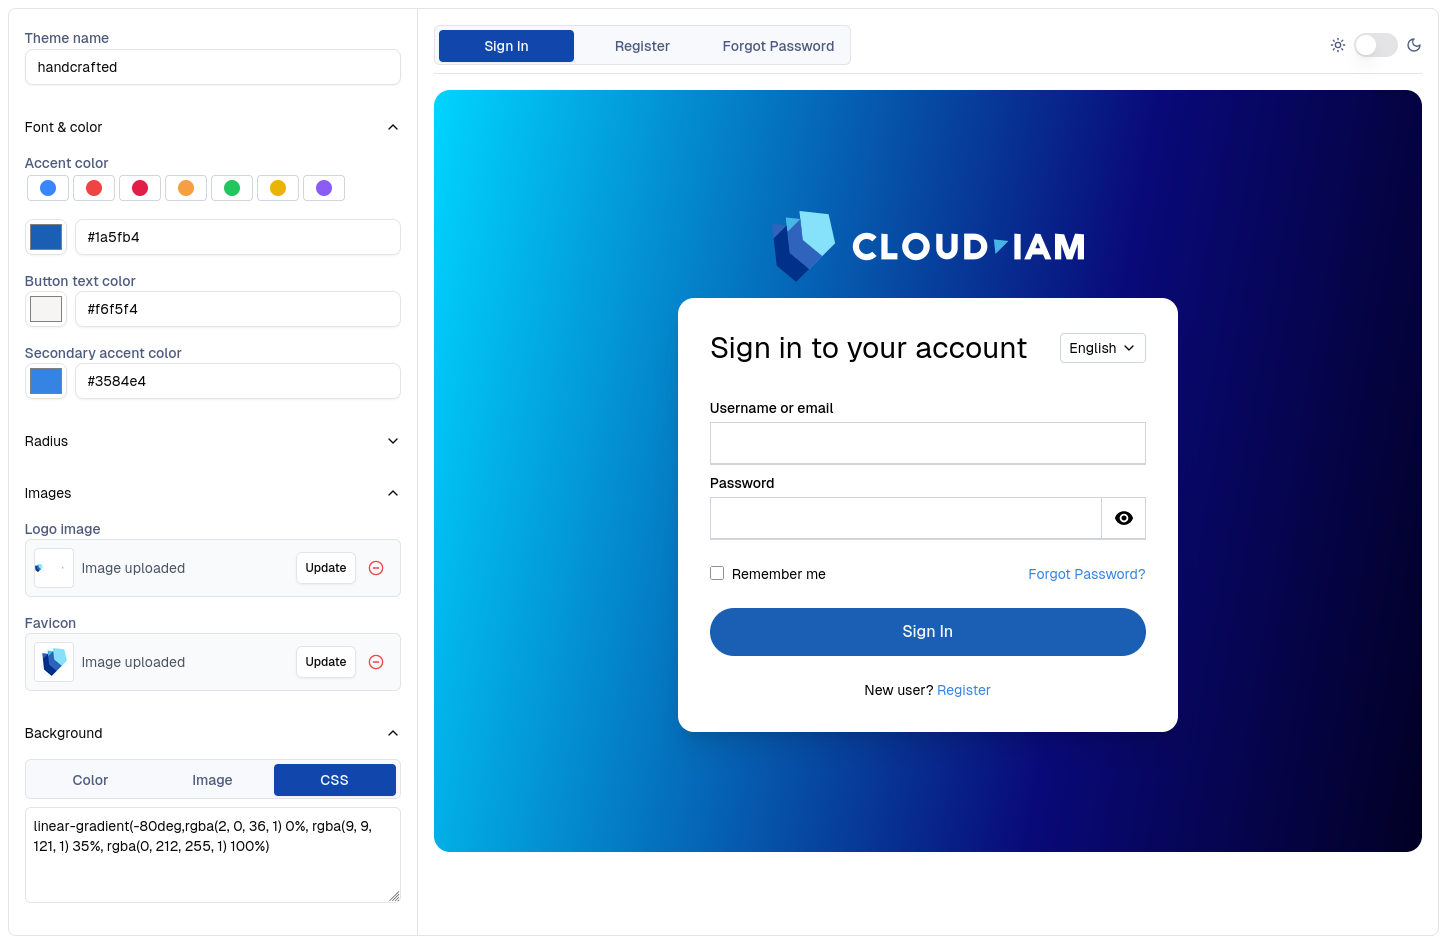
Create theme - Use the visual editor to configure your theme:
- Configure the accent colors
- Control the background appearance
- Set a background color
- Set a background image
- Set a custom CSS
backgroundproperty to achieve effects such as gradients
- Upload resources for the brand logo and favicon
- Adjust the shapes of elements
- When you're done, click
Save - To apply the theme to your Keycloak deployment, click
Deploy, then confirm the redeployment when prompted.
After 5–10 minutes, while your Keycloak deployment redeploys via the rolling upgrade process, the changes will be applied.
Manage multiple theme for multiple realms
Since Keycloak supports realm-based theming, Cloud-IAM lets you create and manage multiple themes.
This means you can deliver a unique and branded login experience for each realm individually.
How to apply your custom theme on a Keycloak realm
This tutorial demonstrates how to apply a custom theme to a non-Master realm in your Keycloak deployment. It assumes your custom theme from the generator is fully deployed and your Keycloak instance is inRunningstatus.
Step 1 - Apply your custom login theme
- Login to your Keycloak as an admin
- Select the realm where you want to apply the custom theme (here: acme-demo)
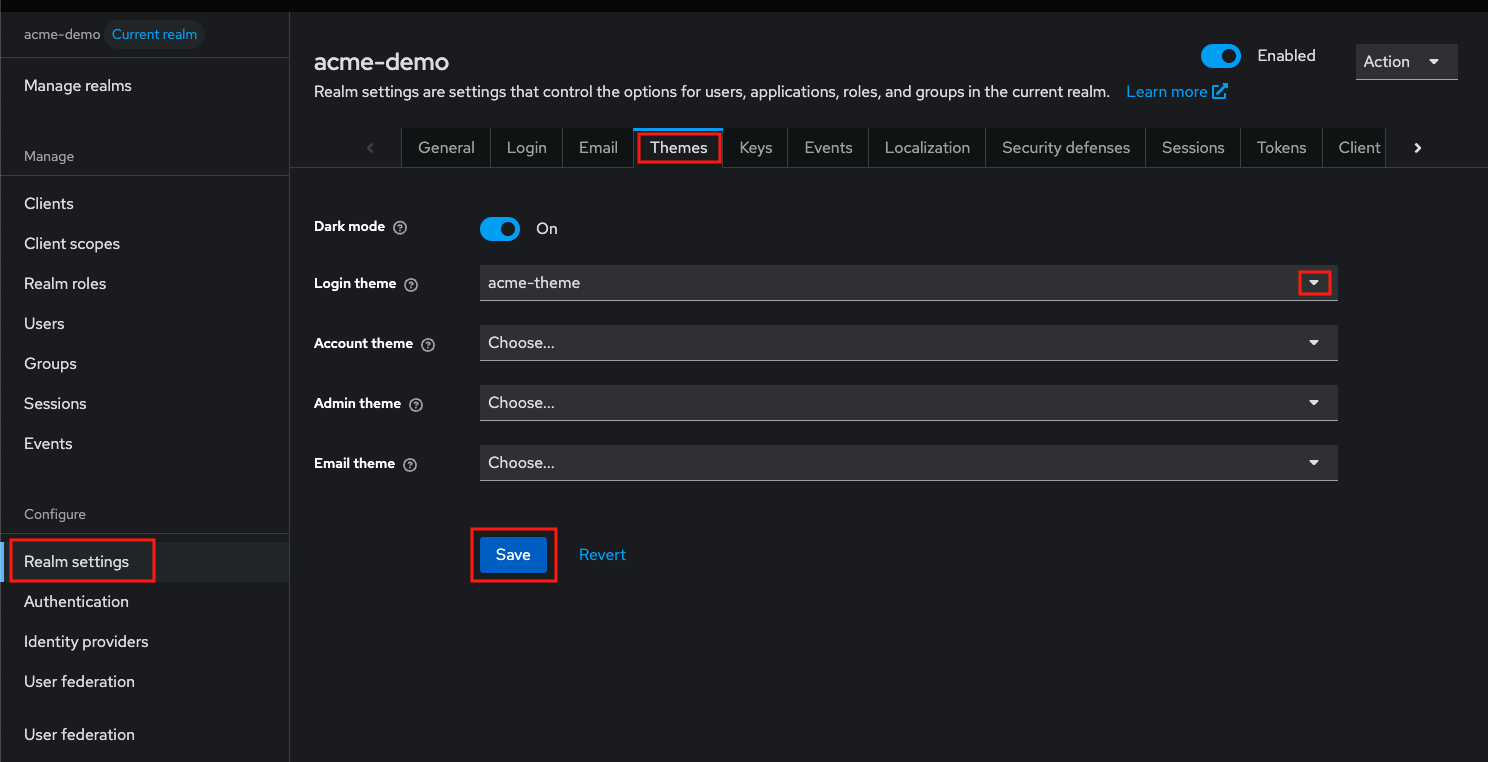
- Navigate to
Realm Settingsin the left-hand menu - Click the
Themestab - In the Login Theme dropdown, select the theme name you created using the Theme Generator.
- Then Click
Saveto apply the changes to the selected realm.
Step 2 - Configure the logo visibility in realm
After applying your custom theme, here in the acme-demo realm:
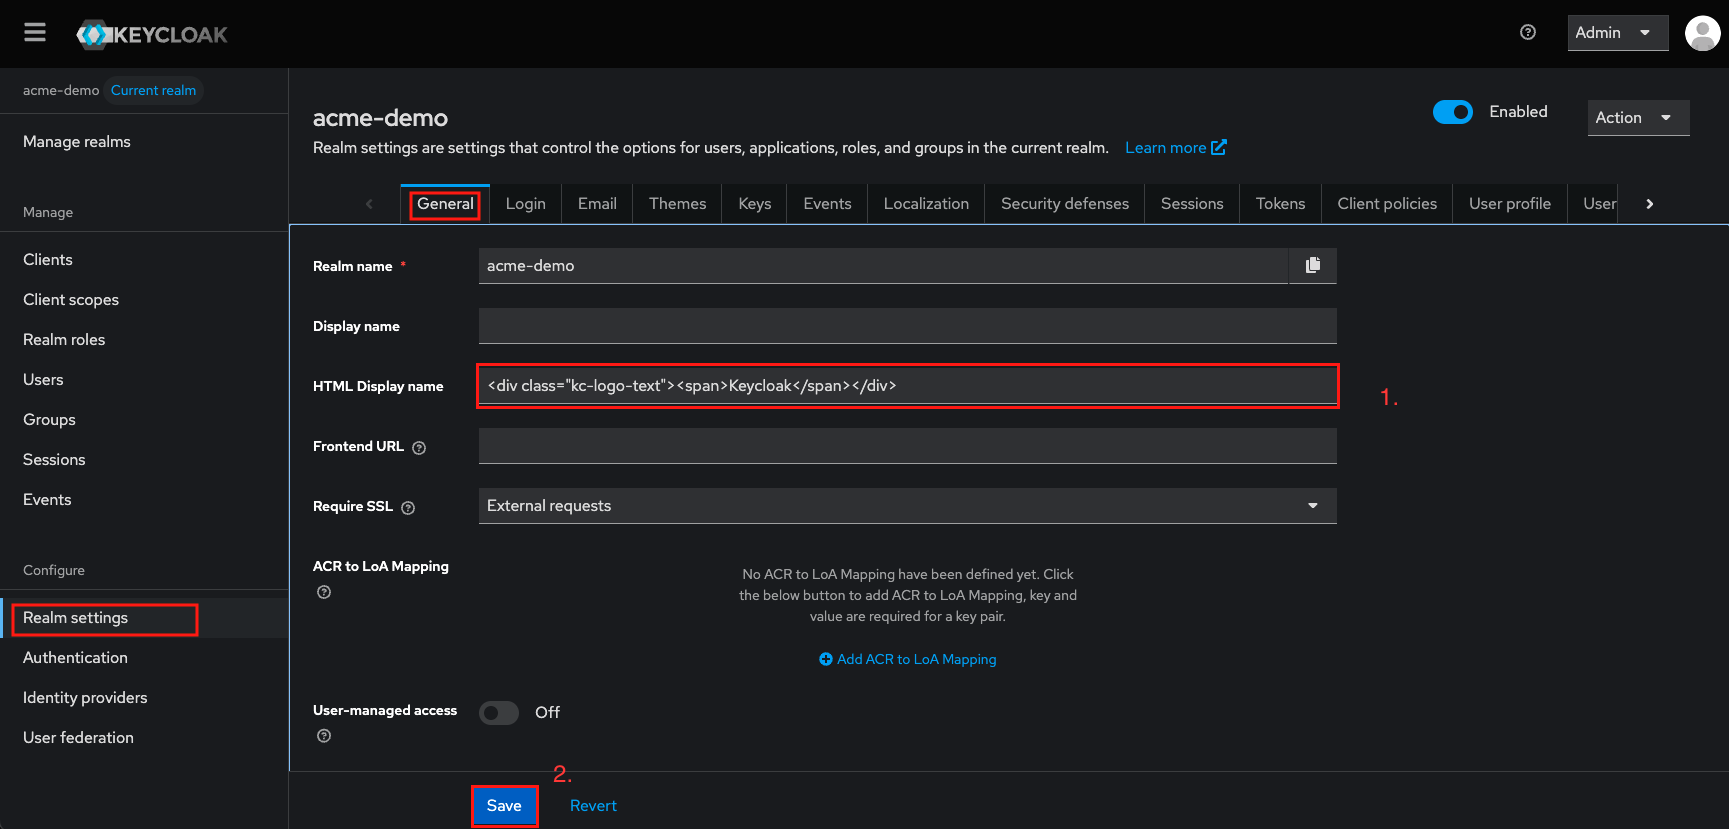
- Navigate to
Realm Settingsin the left-hand menu - Select
Generaltab - In the HTML Display Name field, paste the following snippet to display your logo:
<div class="kc-logo-text"><span>Keycloak</span></div>- Then, Click
Saveto confirm your changes.
Your custom theme and logo will now appear on the realm’s login pages.
Note : If you manage multiple realms, repeat all this process for each realm where you want the theme and logo to appear.
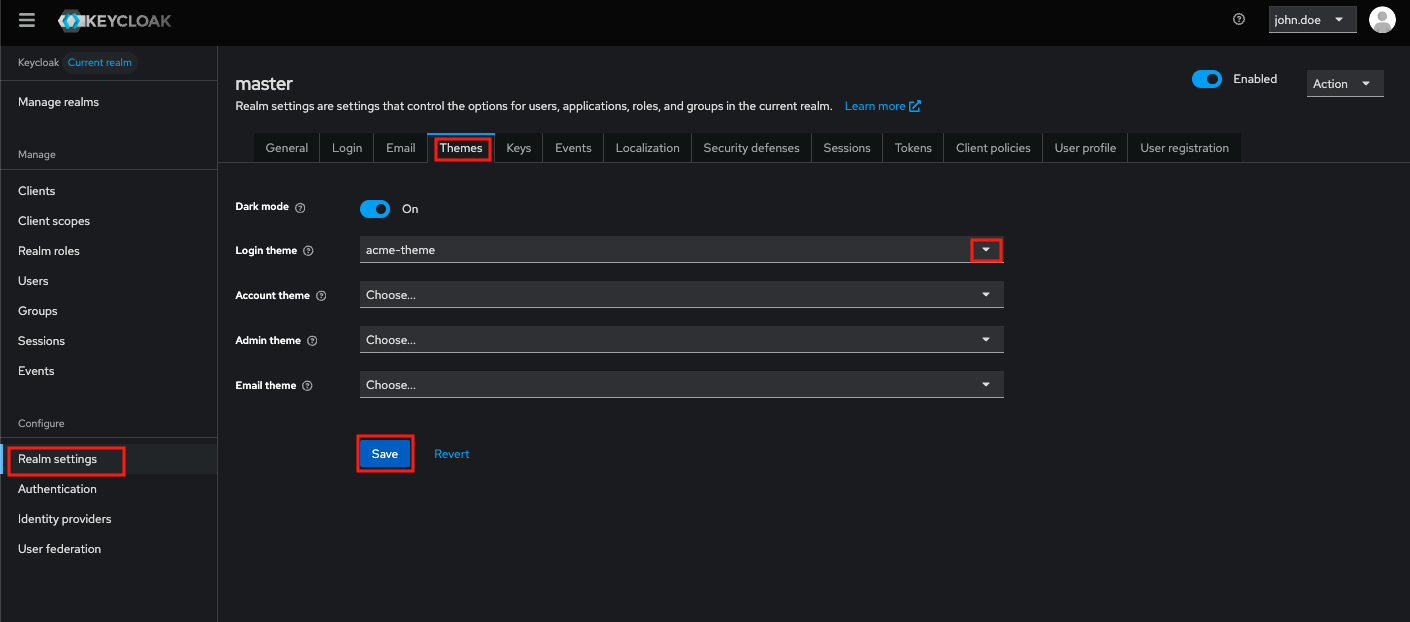
How to apply your custom theme on the Master realm
This tutorial demonstrates how to apply a custom theme to the Master realm in your Keycloak deployment. It assumes your custom theme from the generator is fully deployed and your Keycloak instance is inRunningstatus.
- Login to your Keycloak as an admin
- Select the Master realm
- Navigate to
Realm Settingsin the left-hand menu - Click the
Themestab - In the Login Theme dropdown, select the theme name you created using the Theme Generator.
- Then Click
Saveto apply the changes to the Master realm.
Your custom Keycloak theme is now live on the Master realm.
How to verify your new login experience
To verify the new login experience:
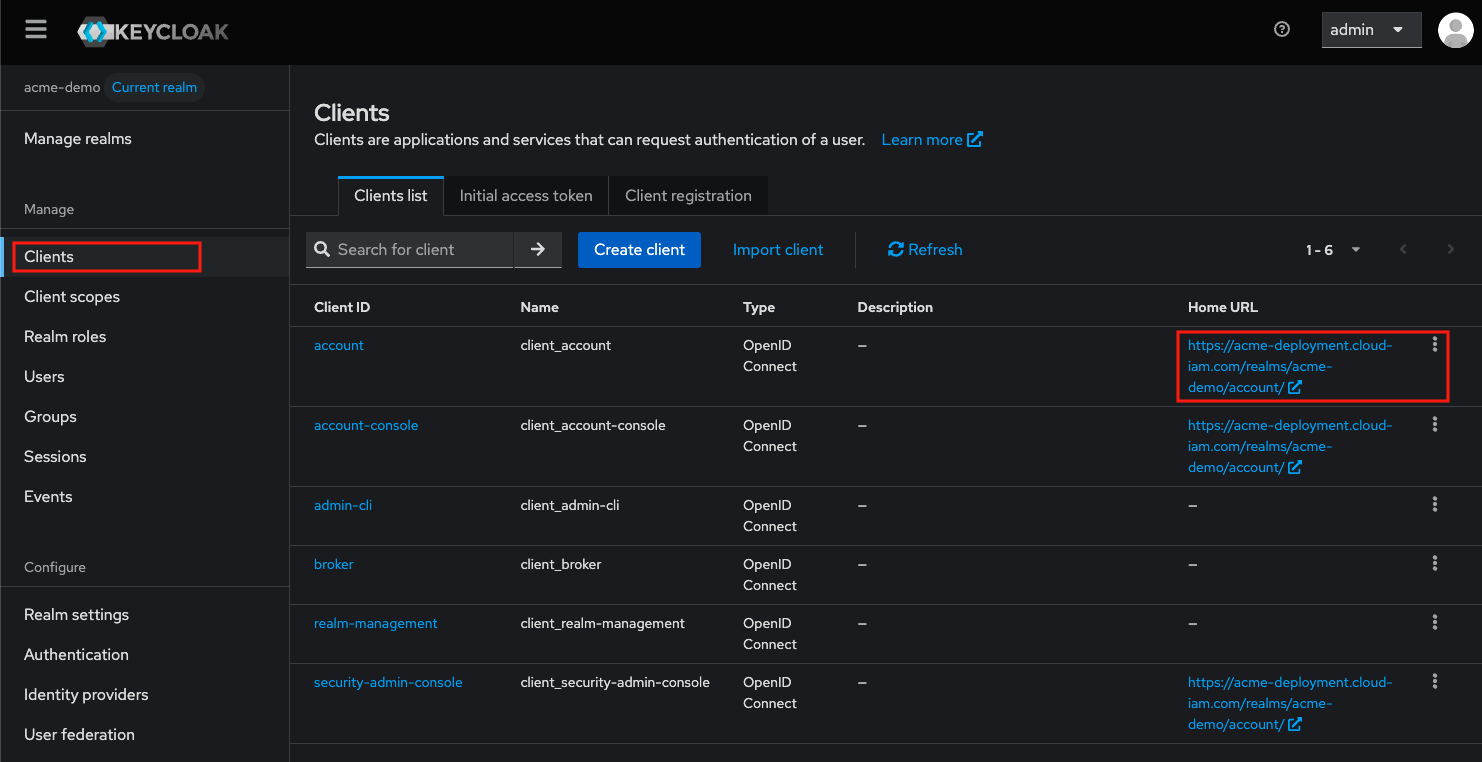
- In the Keycloak Admin Console
- Navigate to
Clients - Locate the
accountclient and copy its Home URL - Open a private/incognito window on your browser and Past the URL
You should see your newly applied branding and layout.