Custom domains
To make the deployment available through a corporate URL, you might need to setup a custom domain. Domain customization allows you to use your organization domain instead of redirecting your consumers to the Cloud-IAM domain.
This will help you maintain consistency and give a frictionless experience to your consumers.
Classic custom domain
In this article, we will assume that the domain my-custom.domain.tld will serve requests from the deployment deployment.cloud-iam.com.
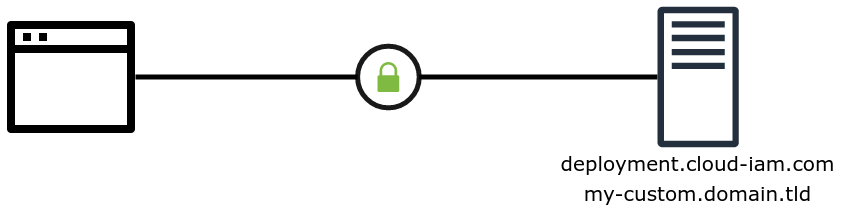
A CNAME entry must be created in the customer DNS registar with name my-custom.domain.tld that targets deployment.cloud-iam.com
TIP
if you plan to create my-custom.domain.tld and my-custom is a DNS zone of domain.tld, then you'll need to create an ALIAS record instead of a CNAME.
The ALIAS record must point to deployment.cloud-iam.com. (be careful to add the trailing .)
In the end-user point of view my-custom.domain.tld becomes an alias of deployment.cloud-iam.com.
The requests still go straight from the user's browser to the Cloud-IAM deployment without any additional server in the middle. Please note that the JWT token issuer (claim iss) will reflect your custom domain.
The requests are TLS encrypted end-to-end.
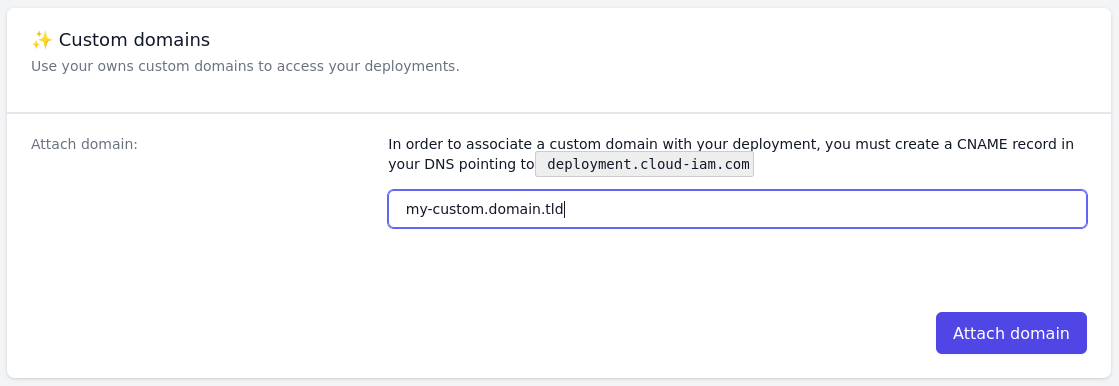
Once the DNS entry has been properly configured, simply declare it through the Cloud-IAM console. This will trigger the certificate generation and installation in minutes.
EV certificates
Cloud-IAM takes the responsibility of generating a valid TLS certificate for my-custom.domain.tld (via Let'sEncrypt ❤️). The generated certificates are Domain Validation.
Despite the type of validation does not impact the strength of security associated with the certificate, customers might want to use their own OV or EV certificates or simply manage the certificate lifecycle by their self. Cloud-IAM support the upload of customer certificates in place of the generated certificates.
WARNING
Note that in this case, it is the responsibility of the customer to renew the certificate before it expires
If the customer wants to use their own certificate, they must provide them via the Cloud-IAM API.
$ DOMAIN=sub.domain.tld
$ DEPLOYMENT_ID=00000000-0000-0000-000000000000
$ TOKEN=$( ... | jq -r .access_token )
$
$ curl -X PUT -H "Authorization: Bearer ${TOKEN}" -H "Content-Type: application/json" \
       "https://api.cloud-iam.com/deployments/${DEPLOYMENT_ID}/custom-domains/${DOMAIN}" -d "{
  \"certPem\": \"-----BEGIN CERTIFICATE-----\nMIIEHDC...\n-----END CERTIFICATE-----\n\",
  \"chainPem\": \"-----BEGIN CERTIFICATE-----\nMIIEWDC...\n-----END CERTIFICATE-----\n-----BEGIN CERTIFICATE-----\nMIIDuzCC...\n-----END CERTIFICATE-----\n\",
  \"fullChainPem\": \"-----BEGIN CERTIFICATE-----\nMIIEHDC...\n-----END CERTIFICATE-----\n-----BEGIN CERTIFICATE-----\nMIIEWDC...\n-----END CERTIFICATE-----\n-----BEGIN CERTIFICATE-----\nMIIDuzCC...\n-----END CERTIFICATE-----\n\",
   \"privateKeyPem\": \"-----BEGIN PRIVATE KEY-----\nMIIEvQIBAD..\n-----END PRIVATE KEY-----\n",
   \"privateKeyPassword\": \"00000000-00000000-00000000-00000000",
}"certPem: contains the X509 certificate for the domain in a PEM formatchainPem: contains the list of X509 certificates of the Certification Authority (in the order intermediate CA, Root)fullChainPem: contains the list of X509 certificates of the certificate of the domain and the Certification Authority (in the order domain certificate, intermediate CA, Root)privateKeyPem: contains the private key of the domain certificateprivateKeyPassword: contains an optional password used to cipher the private key of the domain certificate. Leave null if the private key is not protected
Configuring a reverse proxy
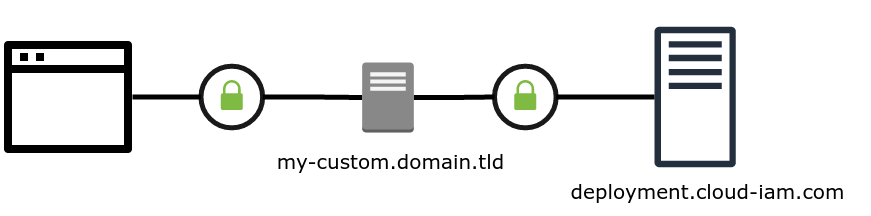
In some cases, the traffic going to the deployment might need to be filtered, analyzed, redirected or customized. This requires the customer to pass every requests through an active server (e.g. Nginx, Traefik, Envoy, Kong, Gravitee, ...) that acts as a reverse proxy.
In this article, we will assume that the domain my-custom.domain.tld will serve requests from the deployment deployment.cloud-iam.com.
In this case, there is no need to declare a custom domain in Cloud-IAM console
Here is a simplified version of the Nginx configuration server that will handle requests on my-custom.domain.tld.
server {

    server_name my-custom.domain.tld;

    ssl_certificate /etc/.../certificate.crt;
    ssl_certificate_key /etc/.../privkey.pem;

    upstream api {
        server deployment.cloud-iam.com:443;
        keepalive 38;
    }

    location / {
        proxy_pass https://api/;
    }
}
In this case, the server is added between the end-user and the Cloud-IAM cluster. As all the traffic passes through this server, this should be replicated horizontally and be reliable.
The TLS certificate for my-custom.domain.tld must be configured and renewed by the customer.
The requests are still TLS encrypted end-to-end.
WARNING
As all the traffic is emitted by the proxy server in a Cloud-IAM point of view, this can lead to rate-limiting Be careful of it and add the server ip to the allowlists.
Configuring a CDN
A CDN (like Cloudflare, AWS Cloudfront, ...) is a reverse proxy at scale with additional features such as intelligent filtering, caching, routing, ... This implies that the end-user requests are not directly routed to the Cloud-IAM cluster, but an additional server (company) interacts before proxying them to the cluster.
In this article, we will assume that the domain my-custom.domain.tld will serve requests from the deployment deployment.cloud-iam.com.
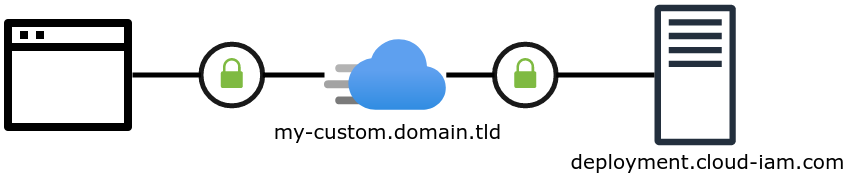
Cloud-IAM's deployments can be 'CDNifed'. In this case, there is no need to declare a custom domain in Cloud-IAM console.
The CDN becomes responsible of managing the TLS certificate for my-custom.domain.tld. It must be configured to use a full encryption mode to ensure the requests are still encrypted end-to-end.
WARNING
As all the traffic is emitted by the proxy server in a Cloud-IAM point of view, this can lead to rate-limiting Be careful of it and add the server ip to the allow lists.